


Installation
975-0053-01-01 2–9
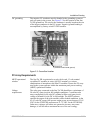
Installation
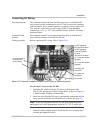
Overview
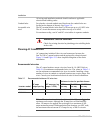
Installation steps There are four main steps in the installation of the Sun Tie XR:
1. Mounting the unit
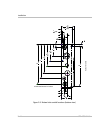
2. Making the DC connections from the PV array to the Sun Tie XR
3. Making the AC connections from the service utility panel to the
Sun Tie XR
4. Grounding the PV array
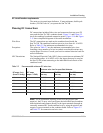
This section also discusses two installation options: connecting inverters
in parallel and connecting the Remote Monitor.
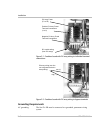
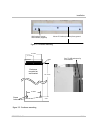
Mounting
Surfaces for
mounting
The Sun Tie XR must be mounted to a flat, vertical surface such as
wallboard or wood siding. Installation onto wallboard or concrete
requires the use of anchors to properly hold the screws.
WARNING: FIRE, SHOCK and ENERGY HAZARDS
Before installing the Sun Tie XR, read all instructions and
cautionary markings located in this manual, on the PV array,
and on the main service panel.
WARNING: SHOCK HAZARD
Before drilling holes to mount the Sun Tie XR, ensure there are
no electrical wires or plumbing in this area. Since this unit is
installed close to the utility entrance or meter, there may be a
high concentration of electrical wire in the area.
CAUTION
The Sun Tie XR weighs approximately 35 pounds. Always use
proper lifting techniques during installation to prevent personal
injury.