


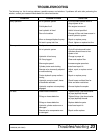
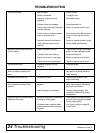
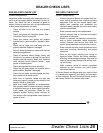


MAN0556 (9/21/2007)
Assembly 31
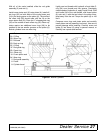
ASSEMBLY
DEALER SET-UP INSTRUCTIONS
Loader assembly is the responsibility of the Woods
dealer. The loader is shipped assembled on a pallet for
your convenience. The loader must be properly set up
and installed to assure prolonged service life and safe
operation.
Keep hands and body away from pressurized
lines. Use paper or cardboard, not hands or other
body parts to check for leaks. Wear safety goggles.
Hydraulic fluid under pressure can easily penetrate
skin and will cause serious injury or death.
Make sure that all operating and service person-
nel know that if hydraulic fluid penetrates skin, it
must be surgically removed as soon as possible by
a doctor familiar with this form of injury or gan-
grene, serious injury, or death will result. CON-
TACT A PHYSICIAN IMMEDIATELY IF FLUID
ENTERS SKIN OR EYES. DO NOT DELAY.
Do not disconnect hydraulic lines until all sys-
tem pressure is relieved. Lower unit to ground,
stop engine, and operate all hydraulic control
levers.
Never work under a raised loader. Always lower
loader to the ground with bucket or loader attach-
ment in full roll-back position. Shut off tractor, set
parking brake, and remove key. Operate valve
levers to release any hydraulic pressure. If loader
obstructs tractor maintenance, loader must be
removed from tractor.
Do not modify or alter or permit anyone else to
modify or alter the equipment or any of its compo-
nents in any way.
Always wear relatively tight and belted clothing
to avoid getting caught in moving parts. Wear
sturdy, rough-soled work shoes and protective
equipment for eyes, hair, hands, hearing, and head;
and respirator or filter mask where appropriate.
ASSEMBLY INSTRUCTIONS
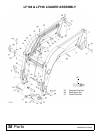
Loader Mounting Kit and Hydraulic Kit
Installation
Install the loader mounting kit on the tractor according
to specific mounting instructions included with the
mounting kit and hydraulic kits.
Loader Set-Up
Make sure all hydraulic hoses, fittings, and
valves are in good condition and not leaking before
starting power unit or using equipment. Check and
route hoses carefully to prevent damage. Hoses
must not be twisted, bent sharply, kinked, frayed,
pinched, or come into contact with any moving
parts. Operate moveable components through full
operational range to check clearances. Replace
any damaged hoses immediately.
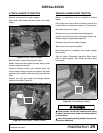
■ Lift and support all loader components safely.
■ Stand clear of the loader while attaching. The
loader could fall, causing serious personal injury.
Always work safely and think clearly!
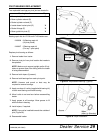
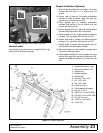
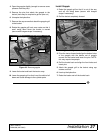
Remove bucket and attachment coupler from shipping
skid.
Support loader frame and remove lag screws from
plates that hold frame on skid. Lower frame to ground.
Using an overhead lifting devise, lift loader frame and
position tractor so uprights can be placed onto loader
mount. Secure uprights on mounts with pin shipped
with frame. Cut shipping straps around boom cylinders
and remove spacer angle and protective sleeves.
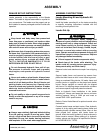
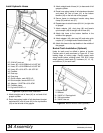
Refer to Hydraulic Hose Installation in the loader
mounting kit. Always use hoses that have a minimum
working pressure rating of 3000 psi and meet or
exceed SAE 100R1 specifications.
Refer to Control Valve Manual for optional control valve
instructions.
Connect loader hoses and start tractor. Clear hydraulic
system of air by raising and lowering boom frame and
actuating bucket cylinders several times. After air has
been purged from system, with loader boom on
ground, check the tractor hydraulic oil level as shown in
tractor owner's manual. When adding oil to hydraulic
system, always use the type of oil specified for the trac-
tor. NEVER MIX OIL TYPES.
CAUTION