


26 Dealer Service
MAN0556 (9/21/2007)
DEALER SERVICE
The information in this section is written for dealer ser-
vice personnel. The repair described herein requires
special skills and tools. If your shop is not properly
equipped or your mechanics are not properly trained in
this type of repair, you may be time and money ahead
to replace complete assemblies.
Never work under a raised loader. Always lower
loader to the ground with bucket or loader attach-
ment in full roll-back position. Shut off tractor, set
parking brake, and remove key. Operate valve
levers to release any hydraulic pressure. If loader
obstructs tractor maintenance, loader must be
removed from tractor.
Never allow anyone to get under the loader
bucket or reach through the lift arms when the
bucket is raised.
Keep all persons away from operator control
area while performing adjustments, service, or
maintenance.
Do not disconnect hydraulic lines until all sys-
tem pressure is relieved. Lower unit to ground,
stop engine, and operate all hydraulic control
levers.
Make sure that all operating and service person-
nel know that if hydraulic fluid penetrates skin, it
must be surgically removed as soon as possible by
a doctor familiar with this form of injury or gan-
grene, serious injury, or death will result. CON-
TACT A PHYSICIAN IMMEDIATELY IF FLUID
ENTERS SKIN OR EYES. DO NOT DELAY.
Keep hands and body away from pressurized
lines. Use paper or cardboard, not hands or other
body parts to check for leaks. Wear safety goggles.
Hydraulic fluid under pressure can easily penetrate
skin and will cause serious injury or death.
Always wear relatively tight and belted clothing
to avoid getting caught in moving parts. Wear
sturdy, rough-soled work shoes and protective
equipment for eyes, hair, hands, hearing, and head;
and respirator or filter mask where appropriate.
CYLINDER SERVICE
The cylinders are designed to be reliable and easy to
service. If a cylinder should malfunction during the war-
ranty period, return the complete cylinder assembly,
without disassembling, to your authorized service
department or contact your authorized service depart-
ment for instructions. Unauthorized disassembly of a
cylinder in the warranty period will VOID WARRANTY.
NOTE: Repair to cylinders is limited to replacing seals,
wear rings, and O-rings. Replacing rod, barrel, or pis-
tons is not cost effective. Purchasing a complete cylin-
der is more economical.
CYLINDER REPAIR
Threaded Rod Guide Cylinders
Threaded guide cylinders for the LF138 and LF156 use
two different styles of seals.
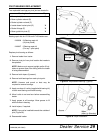
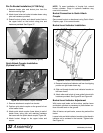
Disassembly
On threaded guide type cylinders, unscrew guide (5)
using a spanner wrench, or carefully use a punch and
hammer. (Spanner wrench 1021841 is available from
Woods to help with these procedures.) Pull on rod (1)
to remove parts from barrel.
Clamp cross pin end of rod assembly (1) in a vise with
protective jaws. Heat threads to break thread locking
compound loose. Unscrew piston (6) from end of rod
assembly using a spanner wrench, or carefully use a
punch and hammer. Remove rod guide (5) from rod.
Remove and discard all seals, wear rings and O-rings.
Clean all components in solvent and blow dry with low
pressure air.
Inspect inside diameter of barrel. Replace cylinder if
damaged.
Assembly
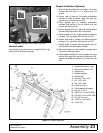
For these assembly instructions the front surface of the
threaded rod guide with two holes will be referred to as
the "rod guide face".
Lubricate O-rings and seals with clean hydraulic fluid.
Install back-up washer (3D) on rod guide (5), and then
install O-ring (3E) in exterior O-ring groove of rod
guide. Make sure that the back-up ring is located clos-
est to the rod guide face. Place rod wiper (3B) in outer
rod guide groove. Install rod seal (3C) into the second
groove from the rod guide face with the open portion of
V-groove toward piston.
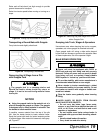
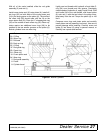
For bucket cylinders (Figure 31) install rings into the
third and fourth grooves from the rod guide face.
CAUTION