Dealer Service 23
15916 (Rev. 5/11/2007)
nicks or bumps. If damage cannot be repaired by resur-
facing with emery cloth, replace damaged part.
Inspect housings for damage, paying specific attention
where seals seat. Replace housing if damaged area
cannot be resurfaced with emery cloth.
Gearbox Assembly
(Refer to illustration on page 45.)
Bearing cups, cones and sleeves are a press fit. Press
new bearing cups into vertical and horizontal housings.
Press bearing cones onto vertical and horizontal shafts
until they seat against machined surface next to gears.
Insert shafts into their respective housings and press
bearing cones onto shaft until all free play is removed
(similar to adjusting front wheel bearings on an auto-
mobile).
Check adjustment by spinning housing. It should turn
freely. If bearings are too tight, hold housing and rap
gear shaft with lead or brass hammer. Readjust bear-
ings. Proper bearing adjustment is essential to good
bearing life. Do not leave bearings adjusted too tight.
Bearings should turn freely without any noticeable end
play.
Place O-ring seal over shaft and seat against bearing.
Press sleeve on shaft and down against bearing, but
do not move bearing. Check bearing adjustment again
by spinning housing. Readjust if necessary.
Protect surfaces where seal seats and tack weld
sleeve to shaft.
Seal Installation
An improperly installed seal will leak and could result in
gearbox failure. Clean area in housing where outer
diameter of seal seats and apply a thin coat of Perma-
tex.
Lubricate seal lip, position spring toward housing, and
carefully guide over sleeve and shaft, using a blunt tool
such as a letter opener. Use care to prevent seal lip
from rolling under. Do not use a knife blade as it will
nick and ruin seal.
Select a piece of pipe or tubing with an OD that will set
on outside edge of seal cage but will clear housing. A
driver that is too small will bow cage and ruin seal.
Carefully press seal into housing, preventing distortion
to metal seal cage. Seat seal firmly against housing.
Gearbox Adjustment
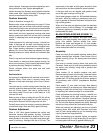
Place a 1/32" thick gasket between the vertical and
horizontal housing and gearbox housing. Horizontal
housing must be positioned so breather hole is at top
when gearbox is on cutter. Snug bolts and check gear
mesh by shining a flashlight into the oil fill hole. The
small ends of the teeth on both gears should be flush
with each other and there should be some backlash.
If the gear teeth are not aligned, add gaskets under
one of the gear housings until they do.
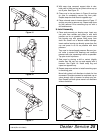
Use a feeler gauge to check for .020 backlash between
the teeth. Adjust by adding or subtracting even num-
bers of gaskets of the same thickness from each hous-
ing and the gearbox.
When all of the bolts are tightened, check the backlash
again to ensure it did not change. If it is changed, add
or subtract gaskets as necessary to obtain .020 back-
lash between the teeth.
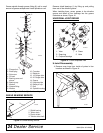
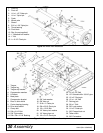
BLADE SPINDLE REPAIR (FIGURE 11)
Remove blades from crossbar and belts from pulley.
Remove split taper bushing from pulley and remove
pulley from spindle. Remove spindle from cutter.
Remove set screw and flanged nut (1) from spindle.
Block under washer (9) and housing and press blade
carrier and spindle shaft out of housing.
Assembly
Press new cups (6) into spindle housing, seating them
against housing bore shoulder. Place bottom end of
spindle housing (18) up. Set bearing cone and sleeve
(5) on cup.
Coat area of spindle housing where seal seats with
Permatex. Press seal (4) (with spring-loaded lip toward
the center) into housing, using care to prevent seal
cage distortion.
Place washer (9) on spindle crossbar and shaft.
Remove bearing cones from housing. Lubricate bottom
seal, turn housing right side up and press down onto
spindle shaft. Fill housing cavity with a lithium grease of
#2 consistency with a MOLY (molybdenum disulfide)
additive.
Place washer (7) over shaft and seat. Seat bearing
cone and sleeve (5) on bearing cup. Adjust bearings by
pressing on shaft until all free play is removed (similar
to adjusting front wheel bearings on an automobile).
Check adjustment by spinning housing; it should turn
freely. If bearings are too tight, hold housing and rap
spindle shaft with a lead hammer. Readjust bearings.
Proper bearing adjustment is essential to good bearing
life. Do not leave bearing adjusted too tightly. Bearings
should turn freely without any noticeable end play.
When the bearings are adjusted, coat area of spindle
housing where seal seats with Permatex and press
seal (4) (with spring-loaded lip up) into housing using
care to prevent seal cage distortion.
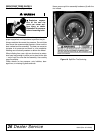
When the bearings are adjusted, tighten nut against
sleeve and bearing (5). Insert brass plug (2) into hole in
nut then tighten set screw (3) against brass plug (2).


