User manual W3532
- 6 -
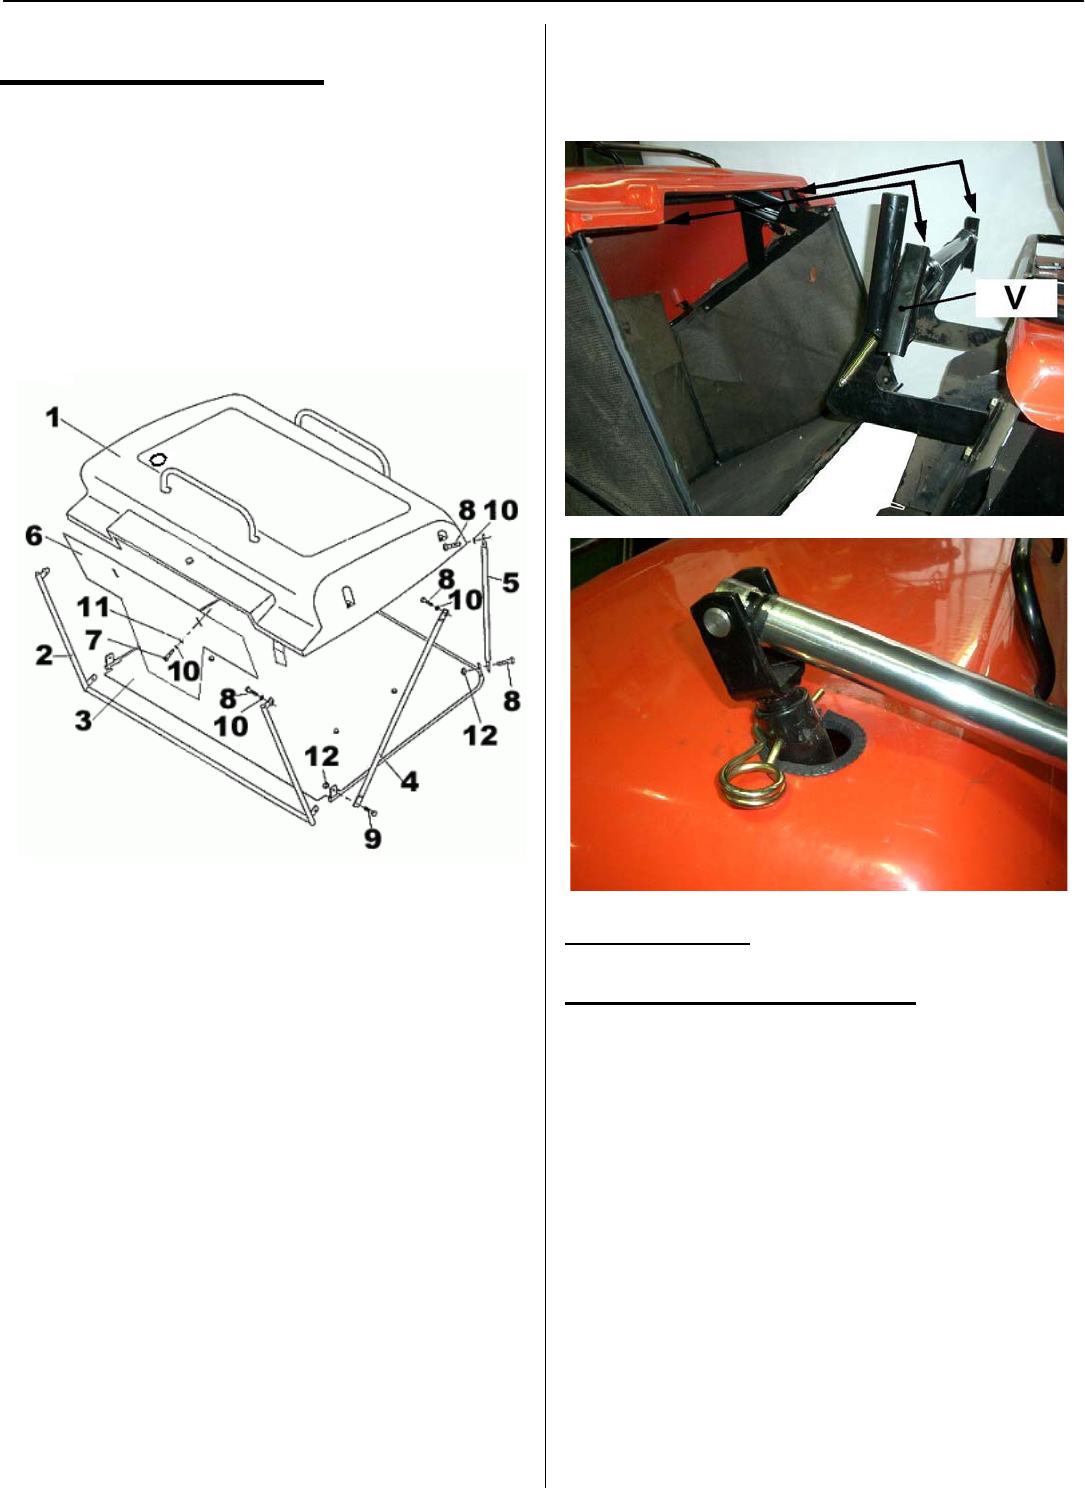
List of parts of the grass storage bin
Pos: Name Pieces
1 bin cover 1
2 front frame 1
3 bottom frame 1
4 brace I. 2
5 brace II. 2
6 curtain 1
7 bolt M6x10 2
8 bolt M6x16 6
9 bolt M6x20 4
10 plate 6 8
11 plate 6.4 2
12 nut M6 4
Fig.2
Assembly of storage bin – Fig.2
For the transport of the machine, the storage bin is partially
disassembled. To assemble, we recommend the following
procedure:
1. The assembly of the storage bin is performed according to
Fig. 2 and the list of parts of the grass storage bin.
2. Place the paper from the package of the cutting machine on
the table or the ground.
3. Place the cap of the storage bin pos. 1 on the paper. Spread
the fabric for the easy assembly of bolts.
4. Screw the curtain to the cap pos.6. Push the curtain to the
cap to the stop.
5. Screw parts. pos. 5,4,2, so that the free ends pos. 5,4,2, are
approximately in the area. For pos. 4 and 2 the holes are in
one axis.
6. Place the frame of the bottom pos.3 with the feet to the free
ends of positions 5,4,2,. Then screw.
7. Lift the fabric and insert the locks of the fabric into pos. 2
and 3.
8. Before the placement of the bin on the self-moving rotary
cutter we recommend to set the guiding “V” (obr.2a) into
the position approximately perpendicular to the ground
(with the switch for lifting the storage bin).
9. Place the storage bin on the guiding according to Fig.2 and
check the tightening of the fabric and the placement of the
storage bin in the closed position!
10. Insert the bar of the fork lifting cylinder into the hole in the
upper cap of the storage bin and secure the fork with the
flexible arrester. Fig. 2b)
Fig.2a
Fig .2b
4. User Manual
4.1 Operation – Fig.3a, 3b, 3c
1. Wheel
2. Panel
3. Pedal for forward and backward travel – travel pedal
4. Brake pedal
5. Parking brake
6. Level for regulation of the height of the cut.
7. Bolt for disconnection of the hydraulic travel
8. Gas lever
9. Choke rod
10. Ignition switch (switch box)
11. Switch for the drive of the cutting mechanism
12. Switch for tilting of the storage bin
13. AUT-MAN switch –switching between automatic and
manual operation
14. Start signal lamp
15. Signal lamp for activation of the cutting mechanism
drive
16. Brake activation signal lamp
17. Full storage bin signal lamp
18. Motor-hours counter – speed indicator – maintenance
indicator


