


www.clearcreekspas.com
www.clearcreekspas.com
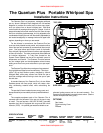
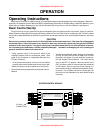
Equipment Set-Up
INSTALLATION
1. Remove the plastic sheet covering the spa. Use care;
stepping into the spa with shoes will scratch the acrylic
surface.
2. Remove any packing materials from the spa.
3. Remove each filter cartridge from its plastic bag.
4. Pull open each skimmer/filter door by the handle lo-
cated in the middle of the door and remove the skimmer
basket. Then insert the filter cartridge into the filter
housing and re-insert the basket so that it fits in place
over the filter cartridge and close the skimmer/filter
door.
5. Clean the interior of the spa of any remaining construc-
tion debris. Remove stubborn stains, paint, or tar with
turpentine, isopropyl alcohol or paint thinner. A mild
liquid dishwashing detergent on a damp cloth is fine for
cleaning off other dirt. Plaster can be removed by
scraping with a wooden edge; do not use a metal
scraper, wire brush, or other metal tools, as they will
damage the spa’s surface.
6. Install the skirt panels which were not installed on the
spa at the factory. To do this, secure with the screws
provided in your spa accessory package and follow
instructions provided with panels.
7. On initial start-up, it is necessary to purge and sanitize
the system. Carefully follow the procedure described
here to purge and sanitize your spa.
• Remove the spa cover completely.
• Close the drain valve located on the suction tee.
• Fill the spa with water to its normal operating level,
which is to the water level indicator mark on the
skimmer/filter frame.
• Turn on circuit breakers at the main electrical panel.
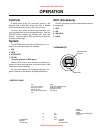
• Select JETS on the SYSTEM switch.
• Add 60cc sodium dichlor (a fast dissolving
granulartype of chlorine) to the water and let
the whirlpool run for 15-20 minutes only.
• Turn off JETS.
• Turn off circuit breakers.
• Immediately open the drain valve and drain
the spa completely.
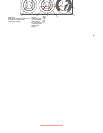
CAUTION: Leave the rigid cover off the spa during
this procedure. Do not use the spa during this
procedure. Drain the spa immediately afterward.
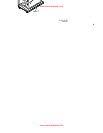
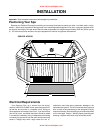
8. Close the drain valve and fill the spa with water to
approximately 180mm (7") below the spa rim, or
to water line indicator mark on the
skimmer frame. (See illustration on this page.)
9. Turn on circuit breakers at the main service
panel.
10. Set the heater thermostat for the maximum tem-
perature.
11. Test the spa for proper operation. (Refer to
Operating Instructions.)
12. Refer to Water Quality section of the Operating
Instructions. Test for water quality; then add
treatment chemicals to ensure proper levels.
All Jacuzzi Whirlpool Bath spas are factory tested for
proper operation and watertight connections prior to
shipping. If leaks or other problems are detected,
immediately notify your Jacuzzi Whirlpool Bath dealer
or Authorized Service Agent, or call Jacuzzi Whirlpool
Bath, (510) 938-7411 (510-938-7070 in California),
for Warranty Service.