


www.clearcreekspas.com
www.clearcreekspas.com
INSTALLATION
Electrical Precautions
CAUTION
Do not apply electrical power to the spa unless it is
filled with water to the normal water level, which is
approximately 7" below the spa rim. (See location of
water level indicator on face of skimmer on page 6.) If
the spa’s motor/pumps are actuated when there is not
sufficient water in the unit, the circulation pumps could
be irreparably damaged. In addition to damaging the
unit, operating the unit with insufficient water could
cause a fire.
Do not locate lighting fixtures directly above the spa;
lighting and electrical receptacles must be located at least
5 ft (1.5m) from the spa. Lighting located between and 5
ft (1.5m) and 10 ft (3m) from the spa must be on a circuit
protected by a ELCB. (See National Electrical Code 680-
6).
Do not use electrically connected devices, such as
television, radio, telephones, stereo speakers, lights or
cooking devices within 5 ft (3m) of the spa when the spa
is being used.
All fixed metal objects located within 5 ft (1.5m) of the
spa, such as fence posts, railings, door frames, green-
house structures, gutters, etc., must be attached to the
bonding bar on the outside of the spa System Control
Module using #8 solid copper wire. With #8 solid copper
wire, bond the spa to the house electrical panel or
approved local earth electrode.
An approved earth electrode may be an 8 ft. long
earth rod, a plate electrode, or a buried metal water
pipe with at least 10 ft. of buried pipe. Check your local
building code for requirements. Bonding lugs are avail-
able at your local electrical supply store. (Bond bar
location is shown on page 5.)
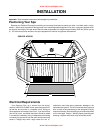
Outdoor Installation
If you install the spa outdoors, we recommend that you
provide a concrete pad for it to rest on. To do this, construct
forms for a 8' x 8' x 4" thick level pad.
Install a #10 gauge wire mesh approximately 6" x 6" steel
reinforced grid. Attach a #8 solid copper wire to the grid with
a ground clamp. This wire should be long enough to reach
the bond bar on the spa System Control Module (min 36"),
but should not be located under the base of the spa. Then
pour the concrete pad.
Drainage
Whether you install your spa indoors or outdoors, you
can drain it completely by attaching a garden hose to the
drain valve located on the suction tee of the spa. Simply run
the hose to the house sewer line or drain field and open the
drain valve.
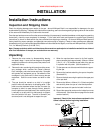
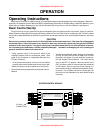
Make sure the area surrounding the spa has good
drainage to keep water from collecting at the base of the
spa—especially near the equipment area. If drainage is
poor, install a drain line and/or gravel drain field (see
illustration below).
Indoor Installations
Water which splashes on the floor during use of the
spa may cause a walking hazard and/or structural dam-
age unless good drainage is provided and proper water-
proof building materials are used in the area surrounding
and beneath the spa. Take into consideration, also, the
high room humidity which will exist due to high spa water
temperatures. Providing natural or forced ventilation of
the room will help maintain comfort and minimize mois-
ture damage to the building. Jacuzzi Whirlpool Bath is
not responsible for damages resulting from excess mois-
ture or water spillage. Consult an architect or engineer for
aid in designing your indoor installation.
SUPPORT AND DRAINAGE
#8 BOND
WIRE
(TO HOUSE ELECTRICAL
PANEL OR LOCAL BOND)
WIRE MES
H
GRID
TO BOND
BAR
8' x 8' x 4"
THICK
CONCRETE PAD