


7
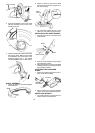
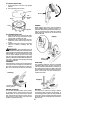
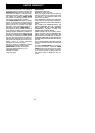
Height
adjuster
Locke d
Unlocked
2. Adjust the length of the tube to the most
comfortable operating position.
3. Turn heightadjuster inthe opposite direc-
tion to lock.
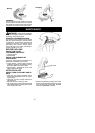
INSTALLATION OF THE WALL
BRACKET
WARNING: Mount the wall bracket
on a smooth, vertical and internal wall. The
wall chosen must be strong enough to hold
the weight ofthebracketandthe u nit.Choose
a location where the unit andwall bracket a re
not likely to be disturbed by children or pass-
ersby .
IMPORTANT! Unplug the charger from the
electrical outlet before connecting or discon-
necting the trimmer to the wall bracket.
1. Mount the wall bracket ina wellve n tilated
area between 4 0_F(5_C) and 78 _F
(25_C).
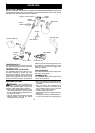
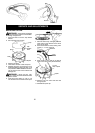
2. There are three mounting holes on the
wall bracket. Position the wall bracket
with the two holes at the top.
Wall Bracket
Mounting
Screw
Holes
Charge
Connect or
3. Ensure that when the trimmer is hung in
the wall br a cket, thebottomof thetrimmer
is within 4inches(100 mm)of theground.
This will make it easier to hang the trim-
mer for charging and will also ensure that
the wall br acket is within eas yreach ofan
electrical outlet for plugging in the char-
ger.
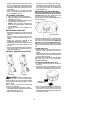
4. Mount wall bracket securely to the wall
with the anchors and screws provided.
CAUTION: When drilling holes, avoid elec-
trical wires in the wall and penetrating com-
pletely through the wall.
Charger
Wall Bracket
5. Your cordless trimm er can no w be a tta ched
to th e wall bracket for charging .