


5
S Have all service and maint enance not ex-
plained in t his manual p erfor medbyan autho-
rize d ser vi ce dealer to avoid creating a haz-
ard.
S Never douse or squirt the unit with water or
any other liquid. Cl ean unit and labels with a
damp sponge. Keep handles dry , clean, and
free from oil and grease.
S Keep the air vents clean a nd fre e of debri s to
avoid overheating themotor. Clean after e ach
use.
TRANSPORTI NG AND STORAGE
S Stop the unit and place in wall bracket for
storage and battery charging.
S Carry the unit with motor stopped.
S Store unitindoors in ahigh, dry place outof
the reach of children.
S Donot hangunit s othat thetrigger switchis
depressed.
BATTERY CARE
S If over a period of time the battery quickly
runs downafter a full 24hour charging peri-
od, a replacement battery is needed.
S There will be so me charge p resentin the bat-
tery, buttoensu re maxi mum r unning time, re-
charge yo ur battery for 24 hours before use .
S Permanent connection to the charger in a
well--ventilated area will automatica lly keep
your batter y fully ch arged and ready for use.
S To prevent perm anent battery damage, never
store in a disch a rged condi tion.
S Battery
Sealed for Life
No m aintenance requir ed
S Battery replacement
Should your battery need to be replaced,
contactyour authorized service dealerfora
replacement battery and for proper dispos-
al of the old battery.
WINTER STORAGE
S Fully charge for 24 hours before winter stor-
age.
S If you are unable to leave your cordless
trimmer on permanent charge, rechar ge
the battery every 3 to 4 months for a full 24
hour chargingperiod tofully chargethe bat-
tery during winter storage.
S A void extended storage without recharge.
S Store i n a cool dry place.
IMPORTAN T!
DISPOSE OF YOUR OLD BATTE RI ES
SAFELY. TAKE THE COMPLETE UNI T
TO YOUR AUTHORIZED SERVICE
DEALER. DO NOT CUT O PEN, BURN
OR INCINERA TE.
SAVE THESE INSTRUCTIONS
ASSEM BLY
WARNING: If received assembled,
reviewall assembly steps to ensure yourunit
is proper ly asse m bled and all fasteners are
secure.
SHAFT ASSEMBLY
WARNING: Ensure th at the exc ess
wire between the switch handle and m otor
housin g i s not twisted and is enclose d in swi tch
handle and motor housing during assembly of
the unit . F ailure t o d o somay resu lt indamage to
the wires and/or th e unit or serious injury to the
operator.
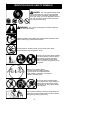
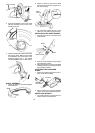
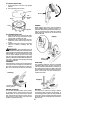
1. Push the tube into the switch handle until
it snaps into place.
Switch Handle
Tube
2. Push the tube into t he motor housinguntil
it sn aps into place.
Tube
Motor Housing
3. T ry to remove tube from switch handle and
motor housing. If the tube re mains in place,
it is properly sn apped into place . If the tube
will not r emain in place , re p eat st eps 1 and
2. Push until the tube snaps into place.
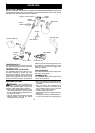
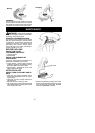
ATTACHING THE SHIELD
WARNING: The shield must be prop-
erly installed. The shieldprovides partial p rotec-
tion from the risk of t hrown obj ects to the opera-
tor and others. Y our unit is equipped with a line
limite r pin, whi ch cuts exce ss line to the prope r
length while running.
NOTE: If shield is not properly instal led, dam-
age to unit (including motor failure ) will resul t.
1. Place the shield onto the motor housing.
Ensure the cutting head remains free to
rotate and the line is not caught between
the shield and the m otor housing (see il-
lustration) .