


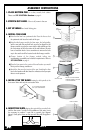
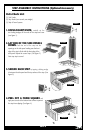
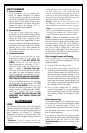

1. PLACE BOTTOM PAD on a clean, smooth, level surface.
Please see SITE SELECTION: Structure on page 4.
2. STRETCH OUT LINER. If liner is stiff, warm in the sun.
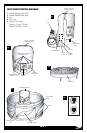
3. SET UP WALLS and install locking pins.
4. INSTALL THE LINER
a) Note that the liner has a patterned side. Place the liner so that
the patterned side faces the inside of the spa .
b)Note that the therapy module, the liner seam, the belt spindles,
and the seat with the punched hole, need to be aligned for the
therapy module to cover the seam and the belt spindles and for
the cover straps to fall in the center of the wall sections. All seats
have a knockout whole. Use a screwdriver to remove the hole
cap in the seat that will be located under the therapy module.
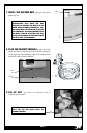
c) Choose location of the therapy module, taking into
consideration accessibility and electrical requirements. Refer to
SITE SELECTION on page 4.
d)Place the liner seam in the center of the wall section you would
like to put the therapy module on.
e) Stretch the liner over the top rim of the spa. Stretching the liner
into its final position will take about five minutes and may require
three or more persons.
5. INSTALL THE TOP BAND locating the belt spindle at the
liner seam. Inline with only the seat suction hole.
6. INSERT THE SEATS, aligning the seat with the punched hole
with the liner seam. To assist in the installation of the seats, it may
be necessary to position 2 seats like a pyramid (see diagram
below). Gently press down on the apex and they will all register in
place.
PAGE 6
ASSEMBLY INSTRUCTIONS
1
5
SPINDLE
BELT
BOLT
TO TIGHTEN ANDTURN
USE 3/8" BOX WRENCH
3
PIN
SPAWALLS
SEAT
ASSEMBLY
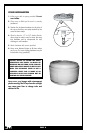
4b
4a
BENCH
ALIGN
BENCH
TO WALLS
KNOCK-OUT HOLE WHERE
THERAPY MODULE SUCTION
IS TO BE INSTALLED
WALL SECTION
6
SEAM LOCATION
LOOKING DOWN