


To Engage Drive
1. To engage the drive, squeeze the Drive Control Lever
completely up against the upper handle to engage the
wheels. To stop the forward motion, release the drive
control.
Note: This Drive Control Lever is a variable speed drive
control. Pulling the drive lever all the way in will give
the operator full speed, however full speed should not
be achieved for some operations, such as during snow
throwing.
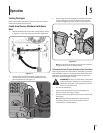
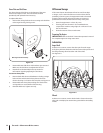
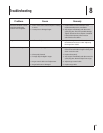
To Engage Augers
1. To engage the augers, push in on the Attachment Control
Lever Safety Lock button (1 in Figure 5-4).
2. Squeeze the Attachment Control Lever completely against
the upper handle (2). To stop the augers, release handle.
1
2
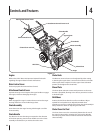
Drive Control Lever
Attachment Control Lever
Attachment Control Lever
Safety Lock
Figure 5-4
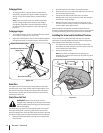
Shear Pins
The augers are secured to the spiral shaft with four shear pins
and cotter pins. If the auger should strike a foreign object or ice
jam, the snow thrower is designed so that the pins may shear.
See the Service Section later in this manual for instructions on
replacing the shear pins.
Chute Clean-Out Tool
WARNING! Never use your hands to clear a
clogged chute assembly. Shut off engine and remain
behind handles until all moving parts have stopped
before unclogging.
The chute clean-out tool is conveniently fastened to the rear of
the auger housing with a mounting clip. Should snow and ice
become lodged in the chute assembly during operation, proceed
as follows to safely clean the chute assembly and chute opening:
1. Release both the Attachment Control Lever and the Drive
Control Lever.
2. Shut off engine as instructed in the engine manual.
3. Remove the clean-out tool from the clip which secures it to
the rear of the auger housing.
4. Use the shovel-shaped end of the clean-out tool to
dislodge and scoop any snow and ice which has formed in
and near the chute assembly.
5. Refasten the clean-out tool to the mounting clip on the
rear of the auger housing, start the snow thrower’s engine
as instructed in the engine manual.
While standing in the operator’s position (behind the snow
thrower), engage the Attachment Control Lever for a few seconds
to clear any remaining snow and ice from the chute assembly.
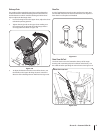
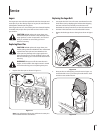
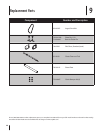
Installing the Snow Sock for Additional Traction
Two snow socks have been included with this snow thrower
attachment to provide additional traction when moving snow.
Follow these steps to install the snow socks:
1. Fit a snow sock over the top of the wheel on the FLEX™
Power Base, as shown in Figure 5-5, then work the rest of it
around the bottom of the wheel.
2. Repeat on the other side.
Note: Snow socks are designed for use during snow
removal only, and are not meant to be used with any other
FLEX attachments.
Figure 5-5
12 Section 5 — operation