


Low Battery Warning: when the batteries on the receiver unit or the
remote unit are low, the Low Battery Indicator icon will light up on the
relevant displays. Follow the steps above to replace the batteries.
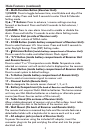
1. Radio-Controlled Clock
The Home Receiver will automatically start synchronizing the clock
after battery/adapter installation or reset. To force searching of the
radio-controlled Atomic Clock signal , press the “ “ button inside the
receiver's battery compartment during normal mode. The antenna
icon ( ) will appear near the Time display during synchronization.
If the “ ” icon disappears afterwards, Atomic time signal is not
available at the moment. Try other locations later. Place the unit
away from source of interference such as mobile phones, appliances,
TV etc.
When the Atomic Clock is successfully synchronized, a full strength
antenna icon ( ) will appear. The Atomic Clock will have a daily
synchronization at 2:03 am everyday. Each reception cycle is 2.5
minutes minimum and 10 minutes maximum.
2. U.S. Time Zone & DST Setting
Press the “ZONE“ button inside the receiver's battery compartment to
select between Pacific (“PA”), Mountain (“MO”), Central (“CE”) and
Eastern (“EA”) time zones. Press “CLOCK” on the front of the receiver
to confirm the zone selection.
Press and hold “ZONE” to enter DST (Daylight Saving Time) setting
mode. Press “p“or “q“ on the front of the unit to enable or disable
the DST setting. Press “ZONE” to confirm DST setting.
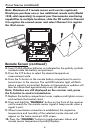
A maximum of 3 remote sensor units can be registered. One
remote sensor is included. To purchase additional Remote
Sensors (Taylor model 1438), please call 1-877-858-0065
Monday-Friday 9am to 6pm CST or visit www.partshelf.com.
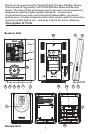
Power Sources (continued)
Setting the Time & Alarm
7