


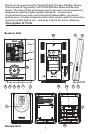


10 - Multi-Function Button (Receiver Unit):
1) CLOCK Press to toggle between time, month/date and day of the
week display. Press and hold 3 seconds to enter Clock & Calendar
Setting mode.
2) p / q Buttons: Press to advance / reverse settings one step
forward or backward. Press and hold 3 seconds to fast advance /
reverse.
3) ALARM: Press to view alarm time and to enable or disable the
alarm. Press and hold for 3 seconds to enter Alarm Setting mode.
11 - Volume Dial (on side of Receiver unit):
Turn to adjust volume of NOAA radio.
12 - ZONE Button (inside battery compartment of Receiver Unit):
Press to select between U.S. time zones. Press and hold 3 seconds to
enter Daylight Savings Time (DST) Setting mode.
13 - Antenna Button (inside battery compartment of Receiver Unit):
Press to search for radio-controlled Atomic Clock signal.
14 - °C/°F Button (inside battery compartments of Receiver Unit
and Remote Sensor):
Press to select °F or °C temperature scale. Note: Temperature scale
selected on receiver unit will control what is displayed on the receiver.
15 - Reset Button (inside battery compartment of Receiver Unit):
Press to reset system to default settings.
16 - Tx Button (inside battery compartment of Remote Unit)):
Press to send a transmission signal to receiver unit.
17 - Channel Switch (Remote Unit):
Slide to designate the remote sensor channel 1, 2, or 3.
18 - Battery Compartment (On back of Receiver and Remote Units):
The remote unit requires 2AAA Alkaline batteries. The home receiver
unit may use 3AA Alkaline batteries as a backup or alternate power
source (see Power Sources section of this manual).
19 - Table Stand (Fits on base of Receiver Unit):
Allows stable placement of receiver unit on a flat surface. Insert table
stand prongs into slots in the bottom of the receiver unit.
20 - Wall Mount (On back of Receiver and Remote Units):
The receiver features a recessed key hole and the remote features a
detachable holder with a keyhole slot to secure each unit to a wall.
21 - AC adaptor jack (on back of Receiver Unit):
To power the receiver using the included AC adaptor, insert the
connector plug into the jack and plug the other end into the proper
electrical outlet.
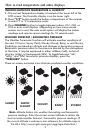
Main Features (continued)
3