


How To Set Up Your Wireless Thermometer
5
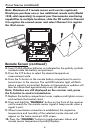
• Place the receiver unit as close as possible to the remote unit.
This will ensure easy synchronization between the transmission and
reception of signals as you set up your wireless thermometer. After set
up is completed, position the receiver unit and remote unit within
effective transmission range.
Note: The effective range is vastly affected by the building materials
and where the receiver and remote units are positioned. Try various set
ups for the best results. Shorten the distance between receiver and
remote units when necessary.
Important: Though the remote unit is weather proof, it should
be placed away from direct sunlight, rain, snow and should
never be submerged in water.
Power Sources
Important: Insert the power supply cord into the home receiver
first, then install batteries into the remote unit:
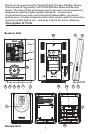
Home Receiver
1. Insert the AC adaptor jack into the back of the unit, then insert the
cord into a 120V household outlet.
2. Three AA alkaline batteries may be used as a back up or alternate
power source: Lift off the battery compartment on the back of the
unit, install 3 alkaline AA batteries according to the polarity
indicated, and close the battery cover. Note: to conserve battery
power, the LCD screen will not be continuously lit when the receiver
unit is running only on batteries. To view the screen, press the
Snooze/Light button on the top of the receiver unit.
Please note: This digital thermometer is also an extremely
sophisticated weather forecasting system. When it is first powered
on, the receiver unit will take approximately one minute to analyze
its surrounding environmental conditions. This “ANALYZING” mode
is indicated by dashes (“----“) in the Barometric Pressure display.
During this minute, some functions (such as Clock Setting or the
NOAA weather radio) may not be operational. Once the
“ANALYZING” mode is complete, a default Barometric Pressure
appears in place of the dashes. The other system functions will then
become operational.
Remote Sensor
1. Lift off the bracket stand, located on the back of the unit, to access
the battery compartment cover.
2. Remove the 4 screws that secure the battery compartment cover
and then remove the cover.
3. Select the Channel setting by sliding the CH switch to Channel 1 to
register the first sensor, included in this package.