


14
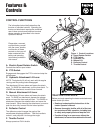
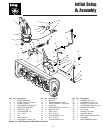
Troubleshooting, Adjustments, & Service
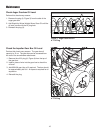
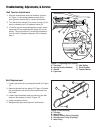
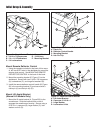
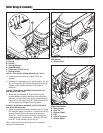
Belt Replacement
1. Loosen the drive belt by turning the handle (C, Figure
11).
2. Remove the belt from the pulley (D, Figure 12) inside
the snowthrower and remove the snowthrower from
the tractor.
3. Loosen the lockwashers and nuts securing two belt
stops on idler pulleys (A and E, Figure 12).
4. Install new belt as shown.
5. Retighten belt stops and adjust the belt tension.
Figure 12. Belt Routing
A. V-Pulley
B. Idler Pulley
C. Electric Clutch Pulley (V-pulley)
D. Snowthrower Pulley (V-pulley)
E. Idler Pulley
A
D
B
C
E
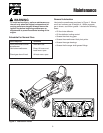
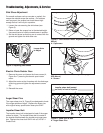
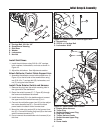
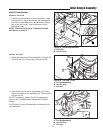
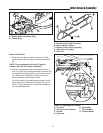
Figure 11. Adjusting Belt Tension
A. Trunnion E. Idler Pulley
B. Spring Tension Bracket F. Pivot Bracket
C. Handle G. Tension Marks
D. Capscrew
Belt Tension Adjustment
1. With the snowthrower drive belt installed, trunnion
(A, Figure 11) should be between marks (G) on
spring tension bracket (B) for correct belt tension.
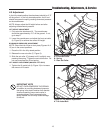
2. Turn belt tension handle (C) to move trunnion (A) for-
ward or rearward until it is between marks (G).
3. If trunnion cannot be placed between marks, loosen
capscrew (D) and reposition idler pulley (E) as nec-
essary. The pivot bracket (F) should be perpendicu-
lar to the hitch. Retighten capscrew (D) and repeat
step 2.
A
C
E
F
B
G
G
A
D