


16
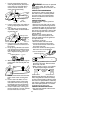
LUBRICATION
Bar Oil
Fill Cap
S
See
GUIDE BAR AND CHAIN OIL
un-
der the
OPERATION
section.
INSPECT AND CLEAN UNIT
AND DECALS
S
After each use, inspect complete unit
for loose or damaged parts. Clean
the unit and decals using a damp
cloth with a mild detergent.
S
Wipe off unit wi th a clean dry cloth.
CHECK CHAIN BRAKE
S
See
CHAIN BRAKE
in the
OPERATION
section.
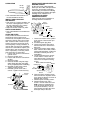
CLEAN AIR FILTER
A dirty air filter decreases the life and
performance of the engine and in-
creases fuel consumption and harmful
emissions. Always clean your air filter
after 15 tanks of fuel or 5 hours of op-
eration, whichever comes first. Cl ean
more frequently in dusty conditions. A
used air filter can never be completely
cleaned. It is advisable to replace your
air filter with a new one after every 50
hours of operation, or annually, which-
ever comes first. To clean filter:
1. Loosen and remove 3 screws from
cylinder cover.
2. Remove cylinder cover.
3. Loosen and remove 2 screws from
air filter.
4. Remove air filter.
5. Clean t he air f ilter using hot soapy
water. Rinse with clean cool water.
Air dry comp let ely before rein stalling.
6. Reinstall air filter and 2 screws.
Tighten screw s securely.
7. Reinstall cylinder cover and 3
screws. Tighten screws securely.
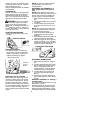
Air Filter
Screws
Cylinder
Cover
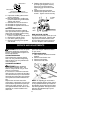
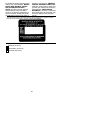
INSPECTMUFFLERANDSPARKAR -
RESTING SCREEN
As t he unit is u sed, carbon deposits
build up on the muf fler and spark arrest-
ing screen, and m ust be removed to
avoid cr eating a f ire hazard o r a f fect ing
engine perform ance. Replace the spark
arrest ing screen if br eaks occur.
CLEANINGTHE SPARK
ARRESTINGSCREEN
Clean every 25 h ours of operation or
annually, whichever comes first.
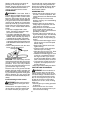
Muffler
Gasket
Muffler
Bolts
Muffler
Locknut
Steel
Backplate
Bolt Cover
Aluminum
Backplate
1. Loosen and remove the 3 cylinder
cover screws. Remove the cylin-
der cover.
2. Pull off the spark plug boot.
3. Loosen and remove the locknut
from the bolt cover. Remove the
bolt cover.
4. Loosen and remove the 2 muffler
bolts. Remove the muffler, muffler
gasket and backplates. Notice the
orientation of these parts for re-
assembling.
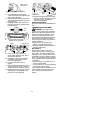
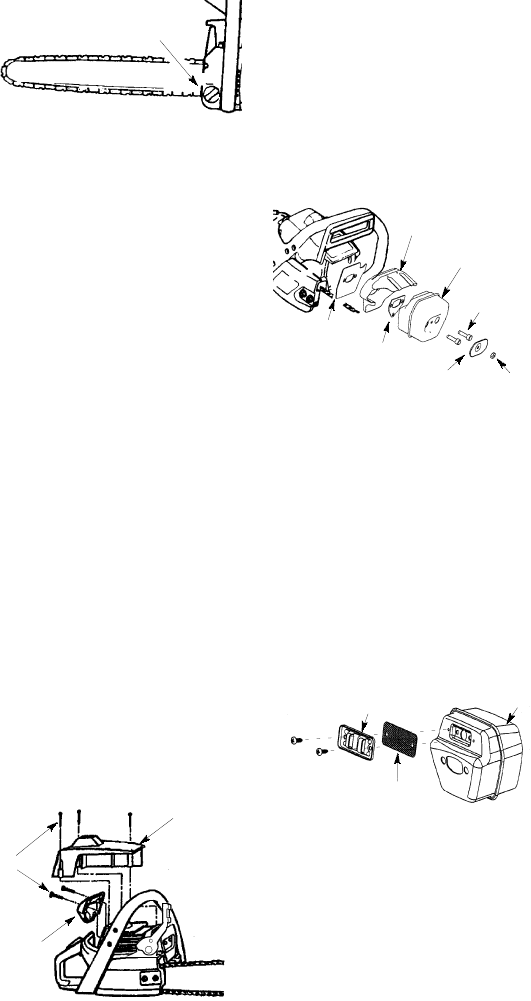
5. Locate the 2 outlet cover screws
on the muffler. Loosen and re-
move both screws. Remove the
outlet cover and spark arresting
screen.
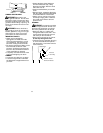
Outlet Cover
Spark Arresting
Screen
Screws
Muffler
BACK VIEW OF MUFFLER
6. Clean the spark arresting screen
with a wire brush. Replace screen
if any wires are broken or screen is
blocked after cleaning.
7. Reinstall spark arresting screen.
8. Reinstall outlet cover and 2
screws. Ensure outlet cover and
both screws are reinstalled cor-
rectly to prevent damage to the
saw (see illustrations). The ex-
haust outlets must face the chain
brake (bar side) of the saw.