


12
IMPORTANT POINTS
S
Cut only one log at a time.
S
Cut shattered wood very carefully;
sharp pieces of wood could be flung
toward operator.
S
Use a sawhorse to cut small logs.
Never allow another person to hold
the log while cutting and never hold
the log with your leg or foot.
S
Do not cut in an a rea whe r e logs,
limbs, and roots are t angled. Dr ag logs
into a clear ar ea bef ore cut ting them .
BUCKINGTECHNIQUES
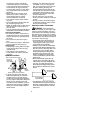
W ARNING:
If saw becomes
pinched or hung i n a log, don’t try to
force it out. You can lose control of the
saw resulting in inj ury and/or damage
to the saw. Stop the saw, drive a
wedge of plastic or wood into the cut
until the saw can be r emoved easily . Re-
start saw and caref ully reenter the cut.
Do not use a met al wedge. D o not at-
tempt t o restart your saw w hen it is
pinched or hung in a log.
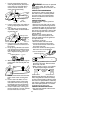
Use a wedgeto remove pinchedsaw
Turn saw OFF and use a plastic or
wooden wedge to force cut open.
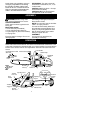
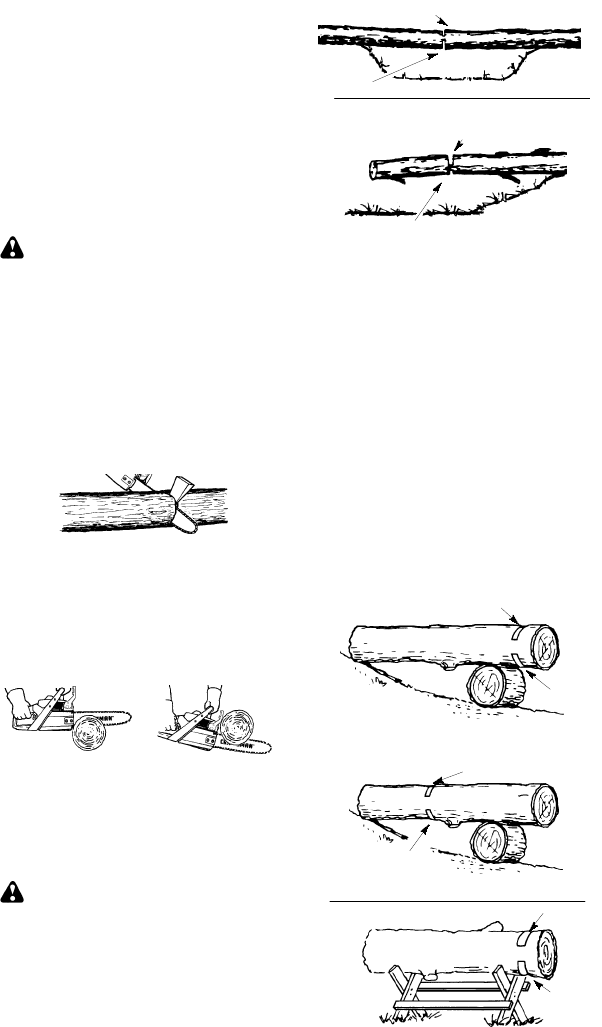
Overcutting begins on the top side of
the log with the bottom of the saw
against the log. When overcutting use
light downward pressure.
Overcutting Undercutting
Undercutting involves cutting on the
underside of the log with top of saw
against the log. When undercutting
use light upward pressure. Hold saw
firmly and maintain control. The saw
will tend to push back toward you.
W ARNING:
Never turn saw up-
side down to undercut. The saw can-
not be controlled in this position.
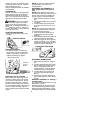
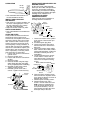
Always make your first cut on the
compression side of the log. The com-
pression side of the log is where the
pressure of the log’s weight i s concen-
trated.
Second
cut
First cut on compression side of log
First cut on compression side of log
Second cut
BUCKINGWITHOUT A SUPPORT
S
Overcut through
1/3
of the diameter
of the log.
S
Roll the log over and fini sh with a
second overcut.
S
Watch for logs with a compresion
side. See illustration for cutting logs
with a compression side.
BUCKINGUSING A LOG OR
SUPPORT STAND
S
Remember your first cut is always on
the compression side of the log. (Re-
fer to the illustration below for your
first and second cut).
S
Your first cut should extend
1/3
of the
diameter of the log.
S
Finish with your second cut.
1
st
Cu
t
2
nd
Cut
Using a log for support
2
nd
Cut
1
st
Cut
1
st
Cut
2
nd
Cut
Using a support stand