


9 - English
OPERATION
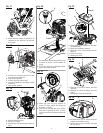
Start the engine.
Stand behind the unit with the tines on the ground and
the work area clean and free of obstructions.
Completely engage the throttle trigger to begin tine
rotation.
NOTE: If the machine moves forward too quickly and
wheels are in position B (see figure 15), push down on
the handlebar to allow the drag bar to penetrate the soil
and slow the forward motion of the unit. The rotating tines
help to pull the machine forward, so use slower speeds
and a shallow depth setting when learning to use the unit
and when cultivating on hard, rough, or uneven ground.
Always operate the unit at full throttle when cultivating.
NOTE: Several passes over the same path may be required
to reach the desired depth. Do not try to dig too deeply in
the first pass. If the machine jumps or bucks, allow the unit
to move forward at a slightly faster rate or install wheel/drag
bar assembly.
To dig more deeply, lift up on the handlebar. Apply downward
pressure on the handlebar for more shallow cultivating.
If the machine stays and digs in one spot, try rocking the unit
from side to side to start it moving forward again.
If the soil is very hard, water a few days before cultivating.
Avoid working the soil when soggy or wet. Wait a day or two
after heavy rain for the ground to dry.
GENERAL CULTIVATING
See Figures 12.
Shallow cultivating less than 2 in. deep can be used to disrupt
weeds and aerate soil, without injuring nearby plant roots. It
should be done often so that weeds do not grow large and
cause tangling in the tines of the unit.
The two outer tines can be removed from the unit to allow
a more narrow cultivating width.
To remove the two outer tines:
Disconnect the spark plug.
Remove the hitch pins from the holes on the ends of the
tine shaft.
Remove the outside tines and felt washers from the tine
shaft.
NOTE: Keep all removable parts in a secure place as they
will be needed when converting back to the cultivating
application.
Place hitch pins in the holes that were uncovered when
felt washers were removed.
NOTE: The unit will not operate properly if the tines are in-
stalled incorrectly. If you notice a problem with the cultivating
operation of the unit, check for proper tine positioning.
Set the choke lever to the HALF CHOKE position.
Pull the starter grip until the engine runs. Do not pull the
starter grip more than six (6) times.
NOTE: If the engine does not start, return to the FULL
CHOKE position and repeat the steps that follow.
Allow the engine to run for 10 seconds, then set the
choke lever to the RUN position.
Move to the rear of the machine and raise it so it rests
on the tines and wheels. Squeeze throttle trigger to run.
To restart a warm engine:
Slowly press the primer bulb 10 times.
Set the choke lever to the RUN position.
Pull the starter grip until the engine runs. Do not squeeze
the throttle trigger to start a warm engine.
To stop the engine:
To stop the engine, depress the STOP switch to the stop
position “O”
IF ASSISTANCE IS REQUIRED FOR THIS
PRODUCT:
Do not return this product to the retail store where it was
purchased. Please call our Customer Service Department
for any issues you may have.
For Help Call: 1-800-860-4050
PREPARING A SEED BED
See Figure 11.
WARNING:
To prevent accidental starting that could cause serious
personal injury, stop the engine and disconnect the spark
plug before installing or removing the wheel/drag bar
assembly or when installing or removing tines.
The cultivator can be used to break up garden soil and
prepare a seed bed for planting. Plan ahead to leave
enough room between the seed rows to allow for machine
cultivating after the plants have grown.
With the wheel/drag bar assembly installed in position A as
described on page 10, roll the machine to the work area.
For general cultivating, remove or adjust the wheel/
drag bar assembly using the guidelines in ADJUSTING
WHEEL/DRAG BAR ASSEMBLY section on page 10.
The wheel/drag bar assembly has three installation po-
sitions to choose from. Based on the type of soil being
cultivated and soil conditions at the time, the appropriate
height of the wheel/drag bar assembly will vary. Adjust the
wheel/drag bar assembly position using the guidelines in
ADJUSTING WHEEL/DRAG BAR ASSEMBLY section .