


Powered Walk Behind Mower Part No. 04016067 Rev E © Copyright 6/2005
5
Rover Mowers Ltd
ABN 11 000 257 303
TM
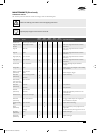
MAINTENANCE
NOTE: The majority of mower problems involve the following problems:
- Dirt or contaminants in the fuel
- Incorrect oil level in the engine
- Blocked, damaged or incorrectly fitted air cleaner
- Incorrectly maintained blades
(Refer to the maintenance section of this and the engine manufacturer’s manual for details.)
• Always ensure equipment is in good working order.
• Do not use any equipment with worn or damaged components.
• Always use genuine Rover replacement parts.
• Never attempt maintenance that is not outlined in this manual. Refer to your nearest authorised Rover Service Dealer.
• Always ensure the engine is stopped and remove the spark plug wire before attempting any maintenance on the mower.
• On Powerstart models remove the key from the ignition before attempting any maintenance on the mower.
• All safety guards, blades, grass catchers and safety labelling must be replaced with genuine Rover parts if worn or damaged.
• Always replace blades and blade fixings in complete sets to maintain balance.
• Remove clipping build-up around the muffler area to prevent a fire hazard.
WARNING
• Refer to and abide to engine manufacturer’s manual.
• Do not allow any dirt or contaminants to enter the fuel tank, oil filler tube, air cleaner housing, carburettor or spark plug hole
when maintaining the engine.
• Ensure there is no clipping build-up in the vents adjacent to the recoil starter. The engine may overheat and be damaged if these
vents are not clear.
• Do not use high pressure cleaners to wash the machine and keep water away from the engine and electrical components.
• If tilting the mower, the engine spark plug must remain uppermost to prevent oil seepage into the air cleaner and/or exhaust.
• To prevent fuel leaking from the tank when tilting the mower ensure the fuel level is low or empty.
• Ensure the mower is dry and clean and stored in a well ventilated area.
CAUTION
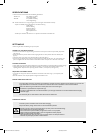
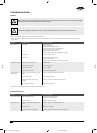
GENERAL CLEANING
• Refer to the general “Warning” and “Caution” notes at the beginning of this section.
• Never open the discharge flap, or lift the mower to wash the underside of the deck with
the engine running.
WARNING
• To ensure safe operation and long life it is recommended to clean the mower after every use. This will prevent corrosion,
overheating and fire risk while ensuring ultimate performance.
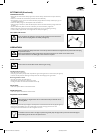
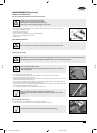
Cleaning the Underside of the Mower
• Place the mower outdoors on a flat surface.
• Remove the grass catcher and close the discharge flap.
• Set the cut height to maximum.
• Start the engine and run at a moderate speed.
• Use a garden hose to direct water through the wash port hole (refer figure 9) for 1-2 minutes.
• Remove the hose and stop the engine.
• Open the rear discharge flap and with the garden hose wash the residual clippings out of the rear section of the mower.
• Inspect the underside and repeat the cycle if still not clean.
Cleaning the Upperside of the Mower
• Use a dry rag or soft brush to remove all loose clippings.
• Use a damp rag with mild detergent to clean away oil or other grime.
• Wash the grass catcher separately from the mower with a hose washing all clippings out of the inside, outside and
from the grass catcher mesh.
• Let the mower dry before storing.
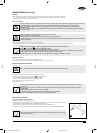
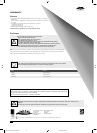
CHANGING THE CUTTING BLADES
Refer to the “Warning” and “Caution” notes at the beginning of this section.
WARNING
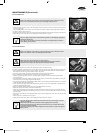
• With the engine stopped, spark plug wire and grass catcher removed, open the discharge flap and prop in the open
position (refer figure 10).
• Set the mower to high cut and fold the upper handle bar down.
• Rotate the cutting assembly carefully to access the blade retaining bolts.
• Using gloves and a suitable spanner, remove the blade assembly.
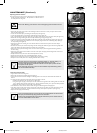
• Retain the ‘D’ plates (where fitted) and discard the blades and fasteners.
• Fit the new blades and fasten in the correct order (refer figure 11).
• Tighten the blade retaining nuts firmly (16Nm).
• Remove the flap prop, close the discharge flap and refit the spare plug wire.
• Remove all clipping build up from around the blade retaining nuts before fitting the spanner.
• Use a ring or socket spanner to prevent slipping off or damaging the blade retaining nut.
• The blade should be free to rotate if the bolts are fitted correctly.
10
9
11
6067 Current Artwork 10-2004.indd 5/31/2005, 8:10 AM5