


Powered Walk Behind Mower Part No. 04016067 Rev E © Copyright 6/2005
3
Rover Mowers Ltd
ABN 11 000 257 303
TM
SETTING UP (Continued)
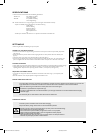
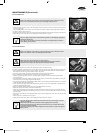
POWERSTART OPTION
• Remove the two screws from the battery support box, rotate the battery and lid forward and expose the battery
terminals.
• Slide the red and black wire from the battery terminals and remove the battery.
• Place the battery in a dry, cool area and connect the battery charger cables to the battery terminals (red [+] to red
[+] and black [-] to black [-]).
• Connect the battery charger to a 240 volt power outlet and switch it on.
• Allow to charge for 10-16 hours, switch the 240 volt power outlet off and remove the battery charger cables from
the battery.
• Refit the rubber battery blocks to each end of the battery and refit into the battery support box.
• Slide the wiring loom connections onto the battery terminals red [+] to red [+] and black [-] to black [-].
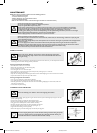
• Locate the battery support box lid, refit and tighten the two screws (refer figure 4).
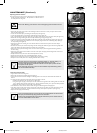
SELF PROPELLED OPTION
Remove and discard the packaging tie clamping the self propelled drive control bale to the
handle bar before attempting to start the mower (refer figure 5).
WARNING
OPERATION
• Refer to and follow the “Safety Instructions” in this and any other associated manuals supplied with this product before attempting
to operate this machine.
• Refer to and understand the safety symbols fitted to the machine and shown in the “Labels” section of this manual.
• Ensure that all the items in the “Setting Up” section have been completed.
WARNING
GRASS CATCHER
• Never install or remove the Grass catcher with the engine running.
WARNING
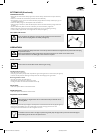
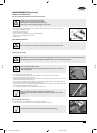
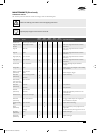
Installing the Grass catcher
•Raise the rear flap of the mower.
• Grasp the grass catcher by the top handle and position the grass catcher against the rear of the mower (refer figure 6).
• Lower the rear flap so that the back edge of the flap hooks over the matching lip on the grass catcher.
Removing the Grass catcher
•Grasp the grass catcher top handle and lift up.
• Raise the rear flap of the mower to release grass catcher.
• Lift the grass catcher clear of the mower and lower the rear flap.
MULCH PLUG
• Refer to the separate Mulch ‘n’ Catch Owners Manual.
GRASS DEFLECTOR
• Refer to the separate Grass Deflector Owners Manual.
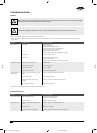
ADJUSTING THE CUT HEIGHT
• When setting the cut height stand to the rear of the machine with your feet well clear of
the cutting blades.
WARNING
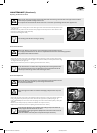
• Grasp the height of cut lever (A) and apply an outward pressure to release the lever from the rack (B) (refer figure 7).
• Move the lever (while holding out) to the required height of cut position and engage the lever in the rack.
• Pushing the lever forward and down raises the cut height and vice versa.
It is advisable to start the mower in the high cut position and gradually drop the height notch by notch until the desired height is
achieved. Starting too low will leave a low spot in the lawn.
6
7
4
5
6067 Current Artwork 10-2004.indd 5/31/2005, 8:10 AM3