


10
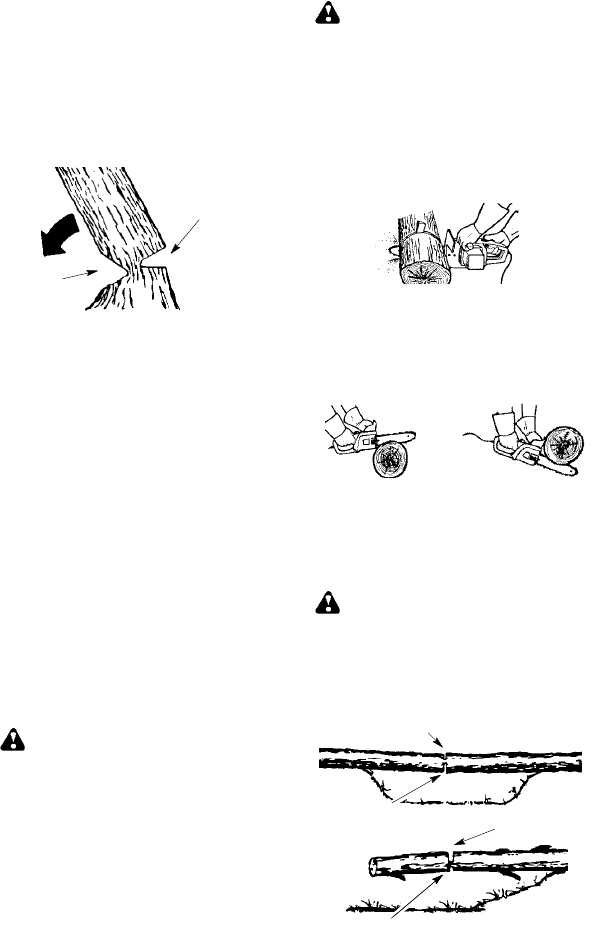
S Afterremovingthe woodfromthe notch,
makethe felling cut on the opposite side
of the notch. This is done b y making a
cut about two i nches higher than the
center of t he notch. Thi s will leave
enough uncu t wood between the felling
cut and the n otch to f orm a h inge. This
hinge will help prevent t he t r ee from fal-
ling in the wrong di r ecti on.
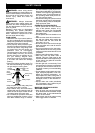
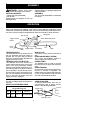
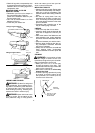
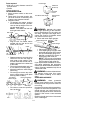
Opening
of felling
cut
Closingof
notch
Hing e holds t ree on stump and
helps con trol fall.
NOTE: Before felling cut is complete,
use wedges to open the cut when
necessary to controlthe direction offall.
To avoid kickback and chain damage,
use wood or plastic wedges, but never
steel or iron wedges.
S Be alert t o signs that the tr ee is r eady to
fall: crackin g sounds, wi de ning of the
felling cut, or movement in t he upp er
branches.
S As tree st arts to fall, stop sa w , put it
down, and get away quickly on your
planned ret r eat path.
S
DONOTuseyoursawtocutdowna par-
ti all y fal l en tr ee. Be extr emely cauti ous
with partially fallen trees that may be
poorly support ed. When a tree doesn’t
fall c ompl et el y, set saw aside and pull
down t r eewith a cablewinch, block and
tackle, or tract or .
CUTTING A FALLEN TREE
(BUCKING)
Buckin g is the ter m use d for cutti ng a fal l-
en tree to the desired log size.
WARNING: Do not stand on the
log being cut. Any portion can rollcaus-
ing loss of footing an d control. Do not
stand downhill of the log being cut.
IMPORTANT POINTS
S Cut only on e log at a t ime.
S Cut shattered wood very car eful l y;
sharp pieces of wood coul d be flung to-
ward oper ator.
S Usea sawhorsetocutsmal llogs.Never
allow another person to hold the l og
whilecutting and never hold the lo g with
your l eg or foot.
S Do not c utin an ar e a wh ere logs, li m b s,
and roots are tangl ed. Drag l ogs into a
clea r area before cuttingthem bypulling
out exposed and cleared l ogs f i rst .
BUCKING T E CH NIQUES
WARNING: If saw becomes
pinchedorhungina log,don’ttr ytoforceit
out .Yo ucanlosecontrolofthe sawresult-
ing in i njur y and/or damag e to the saw.
St op the saw, dr ive a wedge of plast ic or
wood i nt o the cut un t i l the saw can be r e-
movedeasily.Restartthesawandcare-
full y r eent er the cut. Do not use a metal
wedge. Donot at t emptto r est ar t yoursaw
when it is pinched or hung in a log.
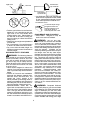
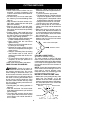
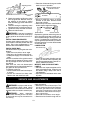
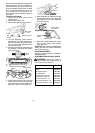
Use a wedgeto remove pinched saw
Turn saw OFF and use a plastic or
wooden wedge to force cut open.
Over cutting begi ns on the topside ofthe
log wit h t he bott om of the saw against the
log.When overcutt i nguse li ghtdownward
pressure.
Overcutting Undercutti ng
Undercutting inv olve s cu tting on the un-
derside of the log with t op of saw agains t
the log. When undercutting use l ight up-
ward pressure. H ol d saw fi r mly andmain-
tain contro l . The saw will tend to push
back toward you.
WARNING: Neverturnsawupside
down to undercut. The saw cannot be
controlled in this position.
Alwa ys make your fi rst cut on the com-
pressions side of the log. The compres-
sion side of the log is where the pressure
of t he l og’s weight is concentrated.
First cut on compression side of log
Second c ut
First cut on compression side of log
Second cut
BUCKING WITHOU T A SU PPORT
S Overcu t through
1/3 of the diam eter of
the log .
S Roll the log over and finish with a se c-
ond overcut .