11
WARNING: Alwaysstopunit anddis-
connect s park plug beforeremoving or instal-
ling attachments.
REMOVING TRIMMER ATTACH-
MENT (OR OTHER OPTIONAL
ATTACHMENTS)
CAUTION:
When removingor installing at-
tachments, place the unit on aflat surface for
stability.
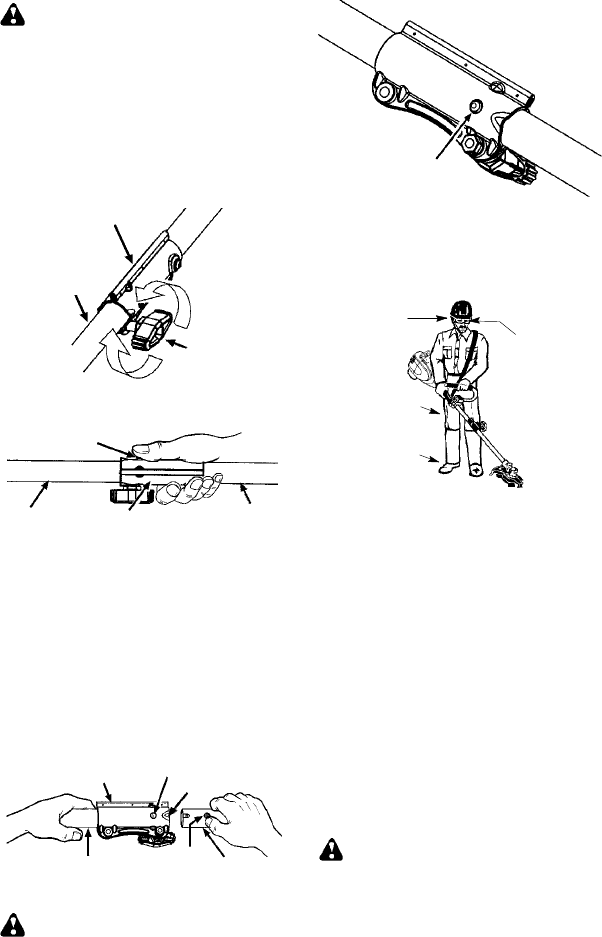
1. Loosen the coupler by turning the kn ob
counterclockwise.
Attach m ent
Coupler
Knob
LOOSEN
TIGHTEN
2. Press a nd hold the locking/ release button.
Locking/Release
Button
Coupler
Upper Shaft
Attach m ent
3. While se curely holding the engine and
upper shaft, pull the attachment st raight
out of the coupler.
INSTALLING OPTIONAL ATTACH-
MENTS
1. Remove the shaft cap from the attach-
ment (if present).
2. Position locking/releasebutton ofattach-
ment into guide recess of coupler.
3. Pushthe attachment intotheco upleruntil
the locking/release button snaps into the
primary hole.
4. Before using theunit, tightentheknobse -
curely by turning clockwise.
Coupler
Primary Hole
Upper
Shaft
Locking/
Release
Button
Attach m ent
Guide Recess
WARNING: Make su re the locking/
release button is locked in the primary hole
and the knob is s ecurely tightened before op-
erating the unit. All attach me nt s are d esi gned
to be used in the p rimary hole unless otherwi se
stat ed in the applicable a ttach ment inst ruct ion
manual. Using the wrong h ole could l ead toser i-
ous injury o r damage to the unit.
Locking/Release
Button in Primary Hole
OPE RATING INSTRUCTIONS
It is recommended that the engine not be
operated for longer than 1 minute at full
throttle.
OPERATING POSITION
Boots
Heavy,
Long Pant s
Eye Protection
ALWAYS WEAR:
Cut from your left to your right.
Hearing
Protection
When operating unit, clip shoulder strap onto
clamp, stand as shown and check for the fol-
lowing:
S Wear hearing protection, eye protection,
head prot ection and heavy clothing.
S Ext en d your left arm and hold handlebar
grip with your left hand.
S Hold throttle grip with your right hand with
finger on throttle trigger.
S Keep unit below waist level.
S Keep shoulder strap pad centered on your
left shoulder and danger sign center ed on
your back.
S Maintain full weight of tool on your left
shoulder.
S Without bending over , keep th e blade or
trimmer head near and parallel to the groun d
and not crowded into materi al being cut.
OPERAT ING INSTRUCTIONS FOR
USE WITH TRIMMER HEAD
WARNING: Always wear eye p rotec-
tion. Never lean over the trimmer head. Rocks
or de bris can ricoche t or be thrown into eyes
and face and cause bli ndness or other ser ious
injury .
Before trimming,bring enginetoa speedsuffi-
cient to cu t material to be tr im med .
Do not r un the engine a t a higher speed than
necessary. The cutting line wi ll cut ef ficient ly
when the engine is run at less than full throttle.
At lowe r spee ds, there is less e ngine noise and
vibration. The cutti ng line wil l last l onger and will
be l ess likely to “weld ” onto the spool.


