


7
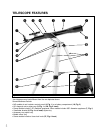
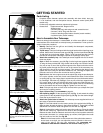
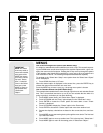
1) Focus Knobs: Use to
move the telescope’s focuser assembly
to obtain precise
image focus. Rotate the focus knobs clockwise to focus on distant objects, and
counterclockwise to focus on nearby objects.
1! Tripod Leg Nuts and Bolts (3): Attach the tripod legs (15, Fig. 1) to the tripod
head (
16, Fig. 1) using these three nuts and bolts. See HOW TO ASSEMBLE YOUR
TELESCOPE, page 8, for more information.
1@ Tripod Struts: Attach the struts to accessory tray. See HOW TO ASSEMBLE YOUR
TELESCOPE,
page 8, for more information.
1# Tripod Leg Lock (3): Lift the lock to loosen the inner section of a tripod leg and
extend the inner leg to the desired height. Press the lock down to lock the leg
again.
1$ Accessory Tray: Use the tray to hold extra eyepieces during your observing ses-
sions.
1% Tripod Legs: Attach the legs to the tripod head (16, Fig. 1). See HOW TO ASSEM-
BLE YOUR TELESCOPE,
page 8, for more information. When observing, spread the
legs out as far as they will open for a secure viewing platform.
1^ Base/Tripod Head:Supports the telescope for placement on the tripod. See HOW
TO ASSEMBLE YOUR TELESCOPE,
page 8, for more information.
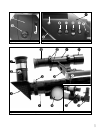
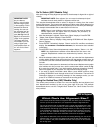
1& Dew shield: Reduces the formation of dew on the telescope's primary lens and
acts as a shade for daytime use.
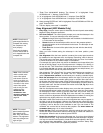
1* Battery Compartment Lid (NGC Models Only): Remove the lid to install one
user-supplied 9v battery in this compartment. See
HOW TO ASSEMBLE YOUR
TELESCOPE, page 8, for more information.
1( Compass/Bubble Level NGC Models Only): Use the compass to locate North
while aligning the telescope. See
EASY ALIGNMENT, page 12, for more informa-
tion. Note that the compass is positioned next to an arrow etched onto the base.
When the arrow of the compass and the etched arrow both point in the same
direction, the telescope is then pointed North.
Use the bubble level to help level the base of your tripod. When the bubble is in
the center of the compass, the base is level.
2) Horizontal Slow Motion Control Knob (NGC Models Only): Use this control to
make fine adjustments in the horizontal movement of the telescope.
2! Viewfinder Lens: Gathers light for the viewfinder.
2@ Viewfinder Alignment Screws: Adjust these screws to align the viewfinder. See
ALIGNING THE VIEWFINDER, page 9, for more information.
2# Viewfinder Eyepiece and Rubber Cup: Turn the viewfinder eyepiece, if neces-
sary, to focus the viewfinder. The rubber cup may be removed, if so desired.
2$ Viewfinder Bracket: Holds the viewfinder in place. Attach to the optical tube. See
HOW TO ASSEMBLE YOUR TELESCOPE, page 8, for more information.
2% Diagonal Mirror Thumbscrew: Tightens the eyepiece in place. Tighten to a "firm
feel" only.
2^ Focuser Drawtube Thumbscrew: Tightens a diagonal mirror or an eyepiece in
place. Tighten to a firm feel only.
2& Focus Lock Knob (Fig. 4 inset): This feature is designed to prevent the focuser
drawtube from moving when a heavy accessory, such as a camera, is attached to
the focuser assembly. For normal observing with an eyepiece and diagonal mir-
ror, it is not necessary to use the lock knob.
2* 90° Diagonal Mirror, Style 2 (Fig. 4 inset): Holds the eyepiece at a convenient
angle for easy viewing. Slide the diagonal mirror into the eyepiece holder and
tighten the thumbscrew to a firm feel only.
NOTE: Sometimes air
gets trapped below the
compass dial causing
the compass to not
work properly.
Gently tap the battery
cover to insure that no
air is trapped below the
compass dial.