


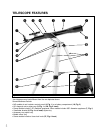


12
7. "Enter Time: 08:00:00AM" displays. The leftmost "0" is highlighted. Press
UP/DOWN until "1" displays. Press ENTER.
8. "8" is highlighted. Press UP/DOWN until "1" displays. Press ENTER.
9. "0" is highlighted. Press UP/DOWN until "3" displays. Press ENTER.
10. Keep pressing ENTER until "AM" is highlighted. Press UP/DOWN until "PM" dis-
plays. Press ENTER.
11. The time display now reads "11:30:00PM."
Easy Alignment (NGC Models Only)
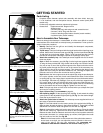
1. Easy Align: Once the control panel is initialized, the control panel automatically
begins the Easy Alignment procedure.
2.
Set Home Position: The control panel prompts you to set the telescope in the
home position. To set your telescope in the home position:
•
Adjust the length of the legs of the tripod until the bubble in the bubble level
is in the center of the compass.
•
Rotate the base of the telescope until the arrow in the compass points in
the same direction as the arrow etched into the base. The telescope is now
pointing North.
•
Push down the front end of the optical tube (the end with the dew shield)
until it stops.
When you have finished setting the telescope in the home position, press
ENTER.
3.
Star Alignment: After the home position is entered, the control panel searches
its database for two alignment stars, and displays "Searching" while it does so.
The control panel uses these stars to orient itself to the sky. Once it is oriented,
it knows the location of any celestial object in its database.
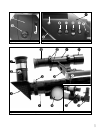
For example, the control panel may search its database and choose Alkaid, the
tail star of the Big Dipper, as the first alignment star. It displays "Ctr. Alkaid" on
the top line and "Then Press Enter" flashes three times on the second line. This
is a reminder that after you center a star in the eyepiece (see step 5 below), you
need to press ENTER. But do not press ENTER yet.
After displaying "Then Press Enter," the control panel displays two numbers on
the second line. For example: "Ctr. Alkaid: +35 -115." These two numbers are
called "
displacement numbers" and will assist you in locating a celestial object.
4.
Move the telescope: Move the telescope tube to the right or left and you will
notice the first displacement number getting larger or smaller. Move the tube in
the direction that makes the number smaller. Keep moving the tube until the num-
ber nears zero. As you near zero, bars appear on the display to make it easier to
precisely reach zero. Use the horizontal slow motion control (
20, Fig. 2) to move
the tube in small increments.
After the first displacement number displays zero, move the tube upwards until
the second displacement number also nears zero. As you near zero, bars appear
on the display to make it easier to precisely reach zero. As you near zero, use
the vertical slow motion control (
F, Fig. 3) to move the tube. You probably will
need to make fine adjustments with both displacement numbers as moving the
optical tube may slightly shift one or the other displacement numbers.
After both number have reached zero, the first alignment star may not appear in
the field of view of the eyepiece. However, the alignment star should be easily
recognized and be the brightest star in the area of the sky where the telescope
is pointing. Look for the star in the viewfinder to see if you can locate it. The
viewfinder has a wider field of view than the eyepiece. See
WHICH ONE'S THE
ALIGNMENT STAR, page 13, for more information.
5.
Center the Star: Once you locate the star, adjust the optical tube using the hor-
izontal and vertical slow motion controls until the star is visible and centered in
the eyepiece. When the star is centered, press ENTER.
6.
Repeat the procedure for the second alignment star. If you have have followed
the procedure correctly, "Align Successful" displays and the telescope is aligned.
You may now use the control panel to locate other stars and objects in the sky. If
your alignment was unsuccessful, "Align Unsuccessful" and then "Setup: Easy
Align" displays. Press ENTER and repeat the procedure.
Note: If the horizontal
and/or vertical move-
ment of the optical
tube seems to be too
loose or too tight, you
can adjust the amount
of tension in the move-
ment of the optical
tube to suit your own
preference. See
ADJUSTING THE
HORIZONTAL AND
VERTICAL TENSION OF
THE OPTICAL TUBE
,
page 20.
NOTE: The control
panel locates alignment
stars based on the
date, time, and location
entered. The alignment
stars may change from
night to night.
NOTE: Sometimes air
gets trapped below the
compass dial causing
the compass to not
work properly.
Gently tap the battery
cover to insure that no
air is trapped below the
compass dial.