16
Object Menu
Almost all observing is performed using the Object menu category. (NOTE: Exceptions
include Guided Tour and Landmark Survey.
)
See GO TO SATURN, page 13, for an
example of observing using the Object menu. Also see
USING THE GUIDED TOUR, page
13.
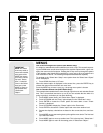
The Object Menu includes:
Solar System is a list of the eight planets (Earth is not included) in order out from the
Sun, followed by the Moon, asteroids, and comets.
Constellation is a list of all 88 Northern and Southern Hemisphere constellations.
When this option is chosen and a constellation name displays (e.g., "Constellations:
Aquarius"), press ENTER to select the constellation. You can use UP/DOWN to dis-
play lines of information about that constellation on the second line of the display.
Press ENTER when the name of a constellation is displayed to display the name of
the brightest star in the constellation. Use UP/DOWN to cycle through the list of
important stars in the constellation (these are generally the stars that make up the
shape of the constellation), from brightest to dimmest. When the desired star is dis-
played, press ENTER to select it. You may now use UP/DOWN to scroll through lines
of information about the selected star, such as the star's celestial coordinates, bright-
ness, and so forth. The last line of information displays as a scrolling message. As the
message scrolls, you can press UP or DOWN to increase or decrease the scrolling
speed.
If you press ENTER when information about the star displays, the displacement num-
bers then display, which tell you how to move the optical tube to locate the star.
See
GO TO SATURN, page 13, for more information about using displacement numbers to
locate an object.
Use MODE to exit this menu.
Deep Sky is a list of objects outside our Solar System such as nebulae, star clusters,
galaxies, and quasars.
Star is a list of stars listed in different categories such as named, double, variable, or
nearby.
User Objects allows the user to create his or her own list of celestial objects that are
not currently in any other list. See
APPENDIX A, page 22, for more information.
Landmarks stores the location of terrestrial points of interest in the permanent user-cre-
ated list i
n the control panel database.
• Select: To select a Landmark already in the database, choose the "Select" option
and use UP/DOWN to scroll through the list. Press ENTER to select a Landmark.
See
LANDMARKS, page 24, for a detailed procedure.
• Add: To add a Landmark, choose the "Add" option. Enter a name for the
Landmark. Locate and center the Landmark, then press ENTER. Note that you
must be aligned with other landmarks for this feature to work properly. See
LAND-
MARKS, page 24, for a detailed procedure.
Identify is an exciting feature for an observer who wants to scan the night sky and
start exploring. Use this feature after the telescope has been properly aligned. Then
follow this procedure:
1. When a desired object is visible in the eyepiece, keep pressing MODE until the
"Select Item: Object" menu is displayed. Then press ENTER.
2. Use UP/DOWN to scroll through the Object menu options until the "Object:
Identify" screen appears.
3. Press ENTER. The computer control panel searches its lists for the identity of the
object being observed.
4. If the object is not in the computer's control panel database, the nearest object in
the database is located and displayed on the screen, along with the object's
celestial coordinates. Press ENTER and the displacement numbers for the object
display. Use the displacement numbers to go to the object, as described in
GO
TO SATURN
, page 13.
Event Menu
The Event menu allows you to display the dates and times of astronomical events.
The Event feature includes:
IMPORTANT NOTE:
To use the Select
and Add features of
the Landmark menu,
the telescope must
be physically locat-
ed in the same
place it was located
when the landmark
list was created.
Also, the optical
tube must be point-
ed at and centered
on the first object in
the Landmark list.


