


7
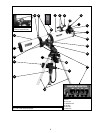
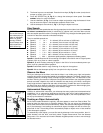
The DS-114AT telescope has a variety of useful features. Be sure to become acquainted with
all of these controls before you begin making observations through the telescope.
³ Focus Knobs:
Move the telescope’s focus drawtube in a finely-controlled motion
to achieve
precise image focus.
ᕢ Eyepiece Holder: Holds the eyepiece in place.
ᕣ Eyepiece Holder Thumbscrews (2): Tighten the eyepiece in place. Tighten to a firm feel only.
ᕤ Eyepiece: Place one of the supplied eyepieces into the eyepiece holder (2, Fig. 1).
ᕥ
Viewfinder: Provides an easier way to initially sight objects than the main telescope eyepiece
which has a narrower field of view.
ᕦ Viewfinder Alignment Screws (4): Adjust these screws to align the viewfinder.
ᕧ Viewfinder Alignment Bracket: Attaches the viewfinder to the telescope (11, Fig. 1).
ᕨ Alt Indicator: Displays the angle (in degrees) of the altitude of the optical tube.
ᕩ Cradle Rings (2): Hold optical tube securely in place.
µ Cradle Ring Lock Knobs (2): Tighten to a firm feel to hold the optical tube securely in
place. Fig. 1c depicts a cradle ring clamped in place by one of the lock knobs and one of
the lock knobs hanging loose.
¸ Optical Tube: The main optical component that gathers the light from distant objects and
brings this light to a focus for observation with the eyepiece.
¹ Primary Mirror Cell: Contains the optical tube's primary mirror and 3 screws that are used
in a collimation adjustment. Note: Do not remove the piece of felt from the cell.
Ƹ Alt (Vertical) Gear and Motor: Moves the telescope along the vertical axis.
ƹ Battery Pack: Supplies power to the assembly. Install 10 user-supplied AA batteries.
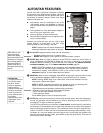
ƺ Autostar: Autostar is able to control nearly all the functions of the telescope.
ƻ Tripod Legs: To use, spread the legs as far as they will open. Adjust the height of the tri-
pod by lifting the clip on each leg and extending the sliding inner section of each tripod leg
to the desired length. Then press the clip back against the leg to lock in place.
Ƽ Accessory Tray: Conveniently holds extra eyepieces, Autostar, and other accessories.
ƽ Az (Horizontal) Gear and Motor: Moves the telescope along the horizontal axis.
ƾ Az Lock: Controls the manual horizontal movement of the telescope. Turning the Alt lock
counterclockwise unlocks the telescope enabling it to be freely moved by hand on the hor-
izontal axis. Turning the Alt lock clockwise (to a firm feel only) prevents the telescope from
being moved manually and engages the vertical motor drive clutch for Autostar operation.
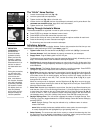
ƿ Computer Control Panel (Fig. 1b)
A. LED: The red power indicator light illuminates when power (i.e., the battery pack)
is supplied to the Autostar handbox and to the telescope’s motor drive.
B.
12V: Plug the battery pack into this port.
C. Handbox (HBX) Port: Plug the #494 Autostar handbox into this port.
D. Azimuth (AZ) Port: Plug the Az motor into this port.
E. Altitude (ALT) Port: Plug the Alt motor into this port.
F. Auxiliary (AUX) Port:
Provides connection for Meade accessories.
© Yoke Mount: Along with the cradle rings, holds the optical tube assembly (11, Fig. 1).
© Alt Lock: Controls the manual vertical movement of the telescope. Turning the Alt lock
counterclockwise unlocks the telescope enabling it to be freely tilted by hand on the verti-
cal axis. Turning the Alt lock clockwise (to a firm feel only) prevents the telescope from
being moved manually and engages the vertical motor drive clutch for Autostar operation.
© Dust Cap: Pull to remove the dust cap from the front lens of the telescope.
Note: The dust cap should be replaced and the power turned off to the telescope
after each observing session. Verify that any dew that might have collected during
the observing session has evaporated prior to replacing the dust cap.
TELESCOPE FEATURES
ᕥ Want to learn
more about the
viewfinder?
See pages 10
through 12.
¹ Want to learn
more about
collimation?
See pages 29
and 30.
21
22
23
ƺ Want to learn
more about
Autostar's
buttons?
See pages 8
and 9.
Autostar's
menus?
See pages 22
through 27.