


18
5. Daylight Savings - Select “Yes” or “No,” then press ENTER.
6. Alignment Option Screen - “Setup: Align” displays. Press ENTER.
7. Select Alignment - “Align: Easy” displays. Press ENTER.
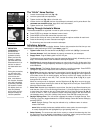
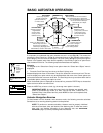
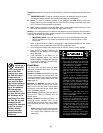
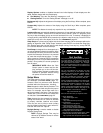
8. Set Alt/Az Home Position - Autostar then prompts you to set the telescope in the Alt/Az
Alignment home position. To set your telescope in the "Alt/Az" home position (Fig. 18):
• Loosen the telescope’s Alt lock (22, Fig. 1).
• Level the tripod base and the optical tube.
• Tighten the Alt lock (22, Fig. 1) to a firm feel only.
• Loosen the Az lock (19, Fig. 1) and turn the telescope horizontally until it points
North. See
LOCATING THE CELESTIAL POLE, page 32 for more information.
• Tighten the Az lock (19, Fig. 1). Press ENTER.
9 . Star Alignment - Autostar then chooses two stars to align upon. When the telescope
slews to the first star for alignment, it may not appear in the field of view in the eyepiece.
The alignment star should be easily recognized and be the brightest star in the area of the
sky where the telescope is pointing. Use the Arrow keys to move the telescope until the
star is visible and centered in the eyepiece. Press ENTER. Repeat procedure for the sec-
ond alignment star.
When the procedure is performed correctly, "Alignment Successful" displays. If Autostar
does not display this message, perform this procedure again.
NOTE: Autostar locates alignment stars based on the date, time, and location
entered. The alignment stars may change from night to night. All that is required is
for the observer to center the selected stars in the eyepiece when prompted.
NOTE: The GO TO key also allows you to perform a "spiral search." A spiral search
is useful when the telescope slews to an object, but that object is not visible in the
eyepiece after the telescope finishes its search. (This sometimes occurs during an
alignment procedure.) Press GO TO when the slew is finished and the telescope
starts slewing in a spiral pattern at a very slow speed around the search area. Look
through the eyepiece and when the object does become visible, press MODE to
stop the spiral search. Then use the Arrow keys to center the object.
Two other methods of alignment are available to the observer: Two-Star and One-Star. These
methods are included in case the observer prefers to pick out his or her own alignment stars.
Two-Star Alt/Az Alignment
Two-Star Alignment requires some knowledge of the night sky. Two-Star Alignment is identical
to Easy Align (see
EASY (TWO-STAR) ALIGN, page 17), except Autostar displays a database of
bright stars and two stars are chosen by the observer from this database for alignment. It is rec-
ommended that you choose stars with which you are familiar from this database when first try-
ing out this method or the One-Star Alignment method.
One-Star Alt/Az Alignment
One-Star Alignment also requires some knowledge of the night sky. One-Star Alignment is iden-
tical to Easy Align (see EASY (TWO-STAR) ALIGN, page 17), except Autostar displays a data-
base of bright stars and one star is chosen by the observer from this database for alignment.
IMPORTANT NOTE: The accuracy of One-Star Alt/Az Alignment, unlike the Two-
Star Alignment procedures, depends on how well the observer levels the telescope
and how close to North the telescope is pointed when setting the Home Position
(Fig. 18). Because the Two-Star Alignment methods use two stars to align upon,
they are more precise than One-Star Alignment.