


17
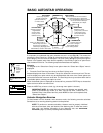
Observe a Star using the Automatic Tracking Feature
In this example, the Autostar Arrow keys are used to find a star, and then Autostar's tracking
capability automatically keeps the star centered in your telescope's eyepiece.
1. Set in Home Position: Level the optical tube and point it North. Make sure that the Alt lock (22,
Fig. 1) and Az lock (19, Fig. 1) are secured as described previously.
2. Connect Autostar: Verify that Autostar is properly connected to your telescope. See
HOW
TO ASSEMBLE YOUR TELESCOPE
page 10.
3. Supply Power: Plug the battery pack into the 12V port.
The Autostar display activates and a copyright message appears briefly, followed by a
short beep. Then Autostar takes a few moments to start up the system.
4. Sun Warning: A message displays that warns not to look at the Sun. At the end of this
message, press the key prompted by Autostar to signify that the message has been read
and understood.
5. Enter Date and Time: Enter these values as previously described.
6. Select Setup: Align Option: Press MODE (3, Fig. 2). "Setup: Align" displays.
7. Select Setup: Targets Option: Press the Scroll Down key (7, Fig. 2) repeatedly until
"Setup: Targets" displays. Press ENTER (2, Fig. 2).
8. Select Targets: Astronomical Option: "Targets: Terrestrial" displays. Press either of the
Scroll keys once (6 or 7, Fig. 2). "Targets: Astronomical" now displays.
9. Locate a Bright Star: Use the Arrow keys (5, Fig. 2) to locate a bright star in the night sky.
Use the viewfinder (5, Fig. 1) to help line up on the star. You may choose any unobstruct-
ed, bright star for the purposes of this excercise. Use Autostar's Arrow keys to center the
star in the eyepiece.
10. To Start Tracking: Once the star is centered, press ENTER to select "Astronomical." The
telescope's tracking motors then engage. It may take the tracking motors several seconds
to begin tracking. When they do, it may be necessary to once again center the star in the
eyepiece. The tracking motors will then keep the star you have chosen in the center of the
eyepiece.
If you wish to track another star, use the Arrow keys to slew the telescope to the star.
Center the star. The tracking motors will then keep that star in the center of the eyepiece.
11. To Stop Tracking: Press ENTER. "Setup: Targets" displays. Press ENTER. "Targets:
Astronomical" now displays. Press either of the Scroll keys once. "Targets: Terrestrial" dis-
plays. Press ENTER. Tracking is now turned off.
Easy (Two-Star) Align
The fastest and easiest way to locate objects with Autostar's GO TO capabilities is to use the
Easy Align menu option.
Autostar automatically picks two stars from its database for the Easy Align procedure. During
this procedure, Autostar slews the telescope to a first alignment star. The user is asked to ver-
ify that the telescope is pointed at the chosen star and then prompted to center the star in the
eyepiece. The process is repeated with a second star to complete the alignment.
NOTE: Before aligning the telescope, first verify that
INITIALIZING AUTOSTAR, page
15, has been performed. See MOVING THROUGH AUTOSTAR’S MENUS, page
15, if you wish to learn how to operate Autostar’s keys.
How to Easy Align Your Telescope
If you have just applied power to Autostar, perform steps 1 through 5. If you have already per-
formed the initialization procedure, go to step 6.
1. Sun Warning - Press the key prompted by Autostar to accept.
2. Getting Started - Press ENTER to continue.
3. Enter Date - Enter the current date as previously described, then press ENTER.
4. Enter Time - Enter the current time as previously described. Select "AM," "PM," or 24-hour
clock (blank). Then press ENTER.
IMPORTANT
NOTE:
While performing
the automatic track-
ing procedure, use
ONLY the Arrow
keys to move the
telescope. Once the
telescope has been
set in the Alt/Az
home position, do
not loosen the az
and alt locks (19
and 22, Fig. 1), or
move the base man-
ually, or alignment
will be lost.
IMPORTANT
NOTE:
Autostar requests
the Country/State,
City, and Telescope
Model information
only the first time
Autostar is activat-
ed. If you wish to
change this informa-
tion, use the "Site"
and "Telescope
Model" options in
the Setup menu.
See page 26 for
more information.