


11
12
E
N
G
L
I
S
H
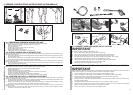
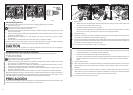
8. Place the nozzle holder onto the panel (located on the handle assembly) and push each nozzle holder into place
(Fig. 3-3D).
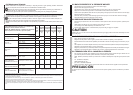
9. Before you connect your garden hose to the water inlet, inspect the inlet
screen (Fig.3-3E). Clean the screen if it contains debris, replace it if it is damaged.
DO NOT RUN THE PRESSURE WASHER IF THE SCREEN IS DAMAGED.
NEVER SIPHON INLETWATER.
10. Run water through the garden hose for 30 seconds to clean out any debris.Turn off water.
CAUTION
There MUST be at least ten feet of unrestricted garden hose between the pressure washer inlet and any flow shut-off
device, such as a 'Y' shut-off connector or other convenience-type water shut-off valves.
Damage to pressure washer resulting from disregarding this caution will not be covered by the warranty.
• Turn ON the water and squeeze the trigger on the spray gun to purge the pump system of air and impurities.
CAUTION
Before starting the pressure washer, be sure you are wearing adequate eye protection.
3-4. CHECKLIST BEFORE STARTING ENGINE
Review the unit's assembly to confirm you have performed all of the following:
1. Make sure the handle is in place and secure.
2. Check that oil has been added to the proper level in the engine crankcase.
3. Add the proper gasoline to fuel tank.
4. Check for properly attached hose connections.
5. Check to make sure that there are no kinks, cuts, or damage to the high pressure hose.
6. Provide a proper water supply at an adequate flow.
7. Be sure to read "Safety Rules" and "How To Use Your Pressure Washer" before using the pressure washer.
E
S
P
A
Ñ
O
L
8. Coloque el soporte de la boquilla en el panel (colocado sobre el ensamblaje del asa) y presione los soportes
hasta colocarlos en su lugar (Fig. 3-3D).
9. Antes de conectar su manguera de jardín a la toma de agua, inspeccione el filtro (Fig. 3-3E). Limpie el filtro si
contiene deshechos o reemplácelo si está dañado.
NO HAHA FUNCIONAR EL LAVADOR A PRESIÓN SI EL FILTRO ESTÁ DAÑADO.
NO FUERCE LA TOMA DE AGUA.
10. Haga pasar el agua por la manguera durante 30 segundos para limpiar cualquier residuo.Cierre la toma de
agua.
ADVERTENCIA
DEBE haber al menos diez piesde manguera entre la toma del lavador a presión y cualquier dispositivo de interrup-
ción, como un conector en 'Y' u otro tipo de válvula de agua.Pueden producirse daños en el lavador a presión result-
ants de ignorar esta precaución.Estos daños no serán cubiertos por la garantía.
• Active la toma de agua y apriete el gatillo de la pistola de pulverización para purgar la bomba del sistema de aire
impurezas.
PRECAUCION
Antes de arrancar el lavador a presión, asegúrese de que utilize la protección ocular adecuada.
3-4. COMPRUEBE LA LISTA SIGUIENTE ANTES DE ARRANCAR EL MOTOR
Revise el ensamblaje de la unidad para confirmar que ha realizado las siguientes tareas:
1. Asegúrese de que el asa se encuentra fírmemente colocada.
2. Compruebe que se haya añadido aceite al nivel adecuado en el tanque del motor.
3. Añada la gasoline adecuada al tanque de combustible.
4. Compruebe que las conexiones de manguera se han realizado correctamente.
5. Asegúrese de que no existen cortes o daños en la manguera de alta presión.
6. Utilice un suministro de agua adecuado con un flujo adecuado.
7. Asegúrese de leer las “Normas de seguridad” y “Cómo utilizar su lavador a presión” antes de utilizar el lavador
a presión.
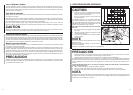
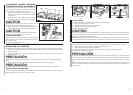
4- STARTING THE ENGINE-PUESTA EN MARCHA DEL MOTOR-
OFF
ON
A
CLOSE
OPEN
B
FAST
SLOW
C
E
ON
OFF
OFF
ON
D
4-1A
4-1B
4-1C
4-1D
4-1E
E
N
G
L
I
S
H
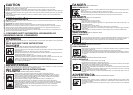
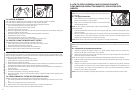
1. Turn the fuel valve (A) to the ON position. (Fig.4-1A)
2. Turn choke lever (B) to CLOSE position for a cold engine starting.
Turn choke lever (B) to OPEN position for a warn engine starting.(Fig. 4-1B)
3. Move the throttle lever (C) fully to the right.(Fig.4-1C)
4. Start engine
a.Turn the engine switch (D) to the ON position. (Fig.4-1D)
b. Gasp starter handle (E). Pull slowly until you can feel drag against you, and then pull rapidly.( Fig. 4-1E)
5. Set the throttle lever (C) at the desired speed.(Fig. 4-1C)
CAUTION:
Does not suddenly release starter handle and let it snap back.The correct way is to slowly let the handle return to
engine.
6. When engine warms up, gradually move the choke lever to the OPEN position.
NOTE: If the recoil start is hard to pull, it may be necessary to squeeze the gun trigger to relieve internal pump pres-
sure.
To STOP ENGINE
In an emergency, stop the engine by turning the engine switch to the OFF position.
Generally, use the following procedure:
1. Move the throttle lever (C) fully to the right.(Fig. 4-1C)
2. Turn the engine switch (D) to the OFF position.(Fig. 4-1D)
3. Turn fuel valve (A) to the OFF position.(Fig. 4-1A)
NOTE:To stop the engine in an emergency, turn the engine switch to the OFF position.
E
S
P
A
Ñ
O
L
1. Gire la válvula ( A) de combustible a la posición ON (CONECTADO).(Fig.4-1A)
2. Gire la palanca del estrangulador (B) a la posición CLOSE(CERRADO) para un arranque con motor frío.
Gire la palanca del estrangulador (B) a la posición OPEN (ABIERTO) para un arranque con motor caliente.(Fig.
4-1B)
3. Mueva la palanca de válvula reguladora (C) completamente a la derecha.(Fig. 4-1C)
4. Arranque el motor
a.Gire el interruptor del motor (D) a la posición ON (CONECTADO). (Fig.4-1D)
b.Tire lentamente del tirador del estárter (E) hasta que note una cierta resistencia y luego tire rápidamente.( Fig.
4-1E)
5. Fije la palanca de válvula reguladora (C) a la velocidad deseada.(Fig.4-1C)
PRECAUCIÓN:
No suelte el tirador del estárter ni deje que retroceda bruscamente.La forma correcta es dejar que vuelva lentamente
al motor.
6. Cuando se haya calentado el motor, mueva gradualmente la palanca del estárter a la posición OPEN (ABIER-
TO).
NOTA:Si el comienzo del retroceso es duro de tirar, puede ser necesario exprimir el disparador del arma para rele-
var la presión interna de la bomba.
PARADA DEL MOTOR
En una emergencia, detenga el motor poniendo el interruptor del motor en la
posición OFF (APAGADO).En condiciones normales, utilice el siguiente procedimiento:
1.Mueva el fullyto de la palanca de válvula reguladora (C) la derecha.(Fig.4-1C)
2.Gire el interruptor del motor (D) a la posición OFF (APAGADO).(Fig. 4-1D)
3.Gire la válvula (A) de combustible a la posición OFF (APAGADO).(Fig.4-1A)
NOTA:Para parar el motor en una emergencia, dé vuelta al interruptor del motor a la posición de reposo.
3-3G
Filter Screen
3-3H