


10
3- ASSEMBLY INSTRUCTIONS- INSTRUCCIONES DE ENSAMBLAJE
E
N
G
L
I
S
H
3-1. PREAPARING PRESSURE WASHER FOR USE
To prepare your pressure washer for operation, you will need to perform these tasks:
• Attach accessory tray to handle, then attach handle to main unit.
• Add oil to engine crankcase.
• Add fuel to fuel tank.
• Connect high pressure hose to spray gun and pump.
• Connect water supply to pump.
• Attach nozzle extension to spray gun.
• Select/attach quick connect nozzle to nozzle extension.
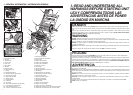
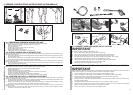
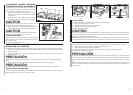
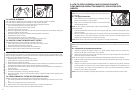
3-2. ATTACH HANDLE AND ACCESSORY TRAY
NOTE: All assembly operations given in this section will be described from the perspective of assembling the pres-
sure washer from the rear.
1. Insert hand to handle support with self tapping screws using a screwdriver.Ensure screws are tight but not crush-
ing the accessory tray.
2. Place the handle assembly (A) onto the handle supports (B) connected to the main unit. Make sure the holes in
the handle align with the holes on the handle supports (Fig.3-2A).
NOTE: It may be necessary to move the handle supports from side to side in order to align the handle so it will slide
over the handle supports.
3. Insert the bolt (C) through the hole on the both side of the handle (D) and attach the plastic knob. Tighten the
knob by hand (Fig.3-2C & Fig. 3-2D).
E
S
P
A
Ñ
O
L
3-1. PREPARAR EL LAVADOR A PRESIÓN PARA SU USO
Para preparer su lavador a presión, necesitará llevar a cabo las siguientes tarea:
• Conecte la bandeja al asa y conecte el asa a la unidad principal.
• Añada aceite al motor.
• Añada combustible al tanque de combustible.
• Conecte la manguera de alta presión a la pistola de puverizado y a la bomba.
• Conecte el suministro de agua a la bomba.
• Conecte la extension de la boquilla a la pistola de pulverización.
• Seleccione/conecte las boquillas de conexión rápida a la extensión de boquillas.
3-2. CONEXIÓN DEL ASA Y LA BANDEJA ACCESORIO
NOTE: Todas las operaciones de ensamblaje que se ofrecen en esta sección se describen desde la perspectiva
trasera al ensamblar el lavador a presión.
1. Inserte el asa en el soporte con los tornillos de fijación automática utilizando un destornillador.Asegúrese de que
los tornillos están firmes pero no presionan la bandeja accesorio.
2. Coloque el ensamble del asa (A) en los soportes de asa (B) conectados a la unidad principal. Asegúrese de que
los orificios del asa están alineados con los orificios del soporte de asa (Fig. 3-2A).
NOTE: Puede que necesite mover los soportes de asa de un lado a otro para alinear el asa y que se ajuste a los
soportes de asa.
3. Inserte la tuerca (C) a través del orificio en el lado derecho del asa (D) y conecte el mando de plástico. Apriete
el mando con la mano (Fig.3-2C & Fig. 3-2D).
A
B
3-3A
3-3B
3-3C
E
N
G
L
I
S
H
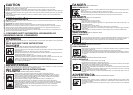
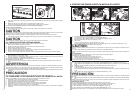
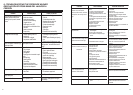
3-3. CONNECT HOSE AND WATER SUPPLY TO PUMP
IMPORTANT
connected and water supplied will damage the pump.
1. Connect high pressure hose (B) to pump outlet.(A) (Fig. 3-3A).
2. Connect the pump high pressure hose (C) with the winding wheel.(D) (Fig. 3-3B).
3. Attach the other female end of the hose to the base of the spray gun (Fig.3-3C).
4. Run water through the garden hose for 30 seconds to clean out any debris.Turn off water.
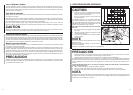
5. Disassemble the coupler female by turning nut anticlockwise (Fig.3-3D).
6. Have the garden hose get through the nut, then attach it to the quick coupler female .
Turn the nut clockwise to assemble with the coupler (Fig. 3-3E).
7. Connect the quick coupler female and male (Fig. 3-3F).
E
S
P
A
Ñ
O
L
3-1. CONECTAR LA MANGERA Y EL SUMINISTRO DE AGUA A LA BOMBA
IMPORTANT
Debe ensamblar la extension de la boquilla y colocar todas las mangueras antes de arrancar el motor. Si arranca el
motor sin las mangueras y el suministro de agua conectados, podría dañar la bomba.
1. Conecte la manguera de alta presión (A) a la salida de la bomba.(B) (Fig.3-3A)
2. Conecte la manguera de alta presión (C) de la bomba con la rueda de la bobina.(D) (Fig. 3-3B)
3. Conecte el otro extreme de la manguera a la base de la pistola pulverizadora.(Fig. 3-3C).
Apriete el tornillo en el sentido de las agujas del reloj.
4. Funcione el agua a través de la manguera del jardín por 30 segundos para limpiar hacia fuera cualquier ruina.
Dé vuelta apagado a water.
5. Desmonte a hembra del acoplador dando vuelta a la tuerca contraria al reloj (Fig.3-3D).
6. hace que la manguera del jardín consiga a través de la tuerca, después la une al Turn femenino del acoplador
rápido la tuerca a la derecha para montar con el acoplador (Fig.3-3E).
7. Conecta a la hembra y a varón (Fig.3-3F) del acoplador rápido.
3-2A 3-2B
3-2C
3-2D
C
D
Quick coupler female
Garden Hose
Nut
Quick coupler female
Garden Hose
Nut
Quick coupler female
Quick Coupler Male
3-3D 3-3E 3-3F
B
A
C
D
9