


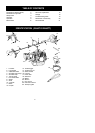
8
INSTALLATION OF THE TRIMMER
HEAD
NOTE:
If your unithas a plastic cover over
thethreads onthethreadedshaft,removethe
coveringtoexposethethreads.Beforeinstal-
lingthetrimmerhead,makesurethedustcup
and retaining washer are positioned on the
gearbox.
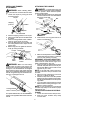
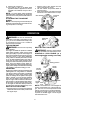
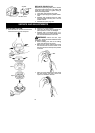
Retaining washer
Dust cup
Gearbox
Aligned holes
Shield
NOTE: Make sure all parts ar e properly
installed as shown i n the illustration before
installing the trimmer head.
1. Align holein thedust cupwiththehole i nthe
side ofthe gearboxby rotating t he dust cup.
2. Insert a small screwdriver into aligned
holes.This willkeeptheshaftfromturning
while tightening trimmer head.
3. While holding thescrewdriver inposition,
thread trimmer head onto the shaft in the
direction shown on the decal (counter-
clockwise). Tighten until secure.
NOTE: The retaining washer must be posi-
tioned wi th th e rai sed section facing toward th e
gearbox.
ASSEMBLY INFORMATION -- WEED
BLADE
WEED
BLADE
NOTE: Remove the trimmer head before
installingtheweedblade.Toremove t hetrimmer
head, align hole in the dust cup with the hole in
the side of t he gearbox by rotatingthe dust cup.
Insert a small screwdriver into aligned holes.
This will keep the shaft from turning while loos-
ening the trimmer head. Remove the trimmer
head by turningclockwise. Removethe screw-
driver . See INST ALLA TION OF T HE TRIM-
MER HEAD for ill ustrations. Be sure t o store all
parts and instructions for fut ure use.
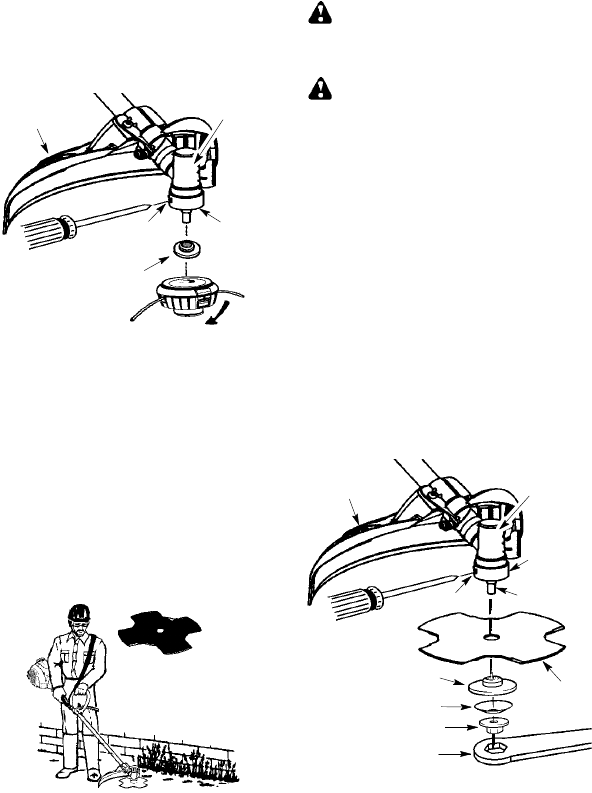
INSTALLATION OF THE METAL
BLADE
WARNING: Wear protective gloves
when handling or performing maintenance on
the b ladetoavoid injury . Theblade is s harpand
can cut you even when it is not moving.
WARNING: Do not use any blades, or
fastening hardware other thanthe washers and
nuts shown in the following illustrations. These
parts must be p rovided by McCulloch and
installed as shown below. Failure to use proper
parts can cause t he blad eto flyoffandseriously
hurt you or others.
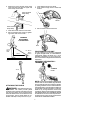
NOTE: Thedust cupis l ocate don t hegearbox
shaft and not in the parts bag. All other fasten-
ers mentioned in the following assembly steps
are in the parts bag.
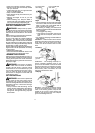
1. Install the blade and t he retainin g washer
over the threaded shaft.
2. Make sure the raised part of the retaining
washer isfacing the gear box andtheraised
area fits into the hole in the center of the
blade.
3. Slide the blade and retaining washer onto
the shaft of the gearbox.
4. Place the cupped washer onto the shaft.
Make surethe cuppedsideof thewasher
is toward the blade.
5. Install theblade nutby threading ontothe
shaft counterclockwise.
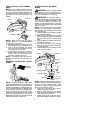
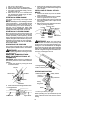
Shield
Blade
Retaining washer
Aligned holes
Cupped washer
Nut
Threaded
shaft
Wrench
Dust cup
Gearbox
NOTE: Make sure all parts are in place as il-
lustrated, and t he bladeis sandwiched bet ween
the dust cup and the retaining washer . There
should be no space between the blade and the
dust cup or the retaining washer.
6. Align hole in dust cup with hole in side of
gearbox by rotating the blade.
7. Insert a small screwdriver into aligned
holes.Thiswillkeeptheshaftfromturning
while tightening the blade nut.
8. Tighten blade nut firmly with wrench (pro-
vided) while holding screwdriver in position.