


8
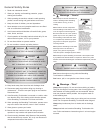
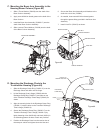
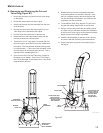
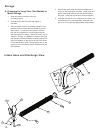
G. Attaching the Chain Loop Assembly to
the Boom Arm Assembly (Figure #6)
1. Slip the threaded end of the Chain Loop Assembly
(720290) through the hole found at the end of the
Boom Arm Assembly (720285.17).
2. Once through, secure the Chain Loop Assembly with
the Nut (64229-05).
3. The level position of the Hose Assembly to the Inlet
Flange Assembly can be controlled by adjusting the
position of the Nut on the thread of the Chain Loop
Assembly.
H. Attaching the Hose Band to the Chain
Loop Assembly (Figure #6)
1. After wrapping the Hose Band around the Hose, insert
the Bolt (64123-61) through the holes in the Hose
Band.
2. Once through, secure the Bolt in the Hose Band with
the Nut (64229-02).
3. Attach the Hose Band to the Chain Loop Assembly
by connecting the chain to the Bolt (64123-61) via the
supplied Carabiner Quick Clip (720487)
4. Make sure the Hose Band is in the proper position with
respect to the Hose to allow free movement with the
Boom Arm Assembly.
FIGURE #6
NUT (720585)
HOSE
BAND
CHAIN LOOP
ASSEMBLY
NUT (720576)
BOOM ARM
ASSEMBLY
BOLT (720588)
Figure #6
I. Adding Oil to the Engine
1. Fill the crankcase with the proper oil to the “F” mark
found on the dipstick. The oil recommendations
are found in the Engine Oil and Fuel section of this
manual.
J. Filling the Gas Tank
1. Fill the tank with the proper fuel. Take extra caution
when filling the tank not to over-fill it. The fuel
recommendations are found in the Engine Oil and Fuel
section of this manual.
K. Connecting the Battery
1. Connect the Red Battery Cable (720339) found
connected to the engine starter to the positive terminal
of the battery with the Bolt (64123-114) and Nut
(64268-01) provided.
2. Connect the Black Battery Cable (720340) found
connected to the engine block to the negative terminal
of the battery with the Bolt (64123-114) and Nut
(64268-01) provided.