


13
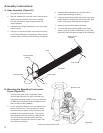
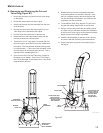
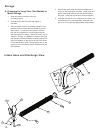
B. Liner Replacement (Figure #7)
1. Complete Steps 1 thru 7 found in section A (Removing
and Replacing the Fan and Talon Ring).
2. Unbolt and remove the hardware securing the Liner to the
Housing.
3. Remove the Liner from the housing by wrapping it and
pulling it through the front of the housing.
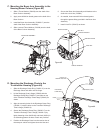
4. When installing the new Liner into the Housing,
make sure the chamfered edge of the liner is installed in
the vertical position at the discharge opening of
the housing.
5. As you position the Liner against the wall of the Housing,
make sure the holes of the liner line up with the slots in
the Housing.
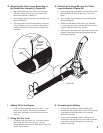
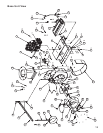
6. Secure the Liner to the Housing (one hole at a time) with
the 10 bolts, washers, and nuts. When installing the
hardware, insert the bolts through the inside surface of the
liner and install the washers and nuts to the outside face
of the Housing.
7. Complete Steps 8 thru 13 found in section A (Removing
and Replacing the Fan and Talon Ring).
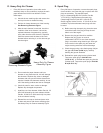
C. Oil and Filter Change
1. Oil Change: Change oil after every 100 hours of operation
(more frequently under severe conditions). Refill with
service class SG, SH, SJ or higher oil as specified in the
“Viscosity Grades” above. Change the oil while the engine
is still warm. The oil will flow more freely and carry away
more impurities. Make sure the engine is level when filling,
checking, and changing the oil. Change the oil as follows:
a) To keep dirt, debris, etc., out of the engine, clean
the area around the oil fill cap/dipstick and drain
valve before moving to the next step.
b) Attach a 1/2” I.D. hose to the fitting on the oil drain
valve. Place the other end of the hose in an oil
pan. Next, remove the oil fill cap and dipstick, then
open the oil drain valve (counter-clockwise) to begin
drainage. Be sure to allow ample time for complete
drainage.
c) Once all the oil has drained, close the valve
(clockwise) and remove the hose.
d) Fill the crankcase, with new oil of the proper type,
to the “F” mark on the dipstick. Refer to “Oil Type”
on page 11. Always check the level with the dipstick
before adding more oil.
e) Reinstall the oil fill cap and tighten securely.
Reinstall the dipstick. NOTE: To prevent extensive
engine wear or damage, always maintain the proper
oil level in the crankcase. Never operate the engine
with the oil level below the “L” mark or over the “F”
mark on
the dipstick.
2. Oil Filter Change: Replace the oil filter at least every other
oil change (every 200 hours of operation). Always use a
genuine Kohler oil filter, Part No. 12 050 OI-S. Replace
the oil filter as follows:
a) Follow steps A to C from the above “Change Oil”
section.
b) Allow the oil filter to drain.
c) Before removing the oil filter, clean the area around
the oil filter to keep dirt and debris out of the engine.
Remove the old filter. Wipe off the surface where
the oil filter mounts.
d) Place a new replacement filter in a shallow pan with
the open end up. Pour new oil, of the proper type,
in through the threaded center hole. Stop pouring
when the oil reaches the bottom of the threads.
Allow a minute or two for the oil to be absorbed by
the filter material.
e) Put a drop of oil on your fingertip and wipe it on the
rubber gasket.
f) Install the replacement oil filter to the filter adapter
or oil cooler. Turn the oil filter clockwise until the
rubber gasket contacts the filter adapter or oil
cooler, then tighten the filter an additional 2/3 to 1
turn.
g) Follow steps 4-5 from above “Change Oil” section.
Start the engine and check for oil leaks. Correct any
leaks before placing the engine into service. Check
oil level to be sure it is up to but not over the “F”
mark.