


10
a) Turn off the engine and wait until all moving
parts have come to a complete stop.
b) Disconnect the spark plug wires from the spark
plugs on the engine.
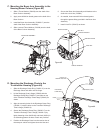
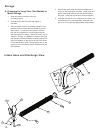
c) Remove the Hose Assembly from the Inlet
Flange Assembly. With this removed, open
the Inlet Flapper and remove any debris that
is clogging the housing. CAUTION SHOULD
BE USED WHEN CLEARING DEBRIS FROM
INSIDE THE HOUSING. GLOVES SHOULD BE
WORN AS SHARP EDGES ON THE FAN, THE
TALON RING, OR IN THE DEBRIS MAY BE
PRESENT.
d) Remove the Discharge Chute from the
Transition Discharge Tube’s flange. With
the Chute removed, inspect the Transition
Discharge part of the housing and remove any
debris clogging this area. CAUTION SHOULD
BE USED WHEN CLEARING DEBRIS FROM
INSIDE THE HOUSING. GLOVES SHOULD BE
WORN AS SHARP EDGES ON THE FAN, THE
TALON RING, OR IN THE DEBRIS MAY BE
PRESENT.
e) Inspect the Discharge Chute for debris and
remove any debris clogging this area.
f) In order to re-assemble the removed parts,
please refer to the Assembly Instructions
found in this manual. After the unit is
re-assembled, reconnect the spark plug wires
and resume operation.
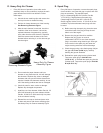
E. Re-filling the Gas Tank
1. If the unit was being operated, make sure the
engine has been turned “off” and is allowed to cool off
completely.
2. Once you have determined the engine is cool, fill
the tank with the proper fuel. Take extra caution
when filling the tank not to over-fill it. The fuel
recommendations are found in the Engine Oil and Fuel
section of this manual.
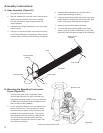
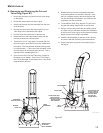
Transportation:
A. Preparing the TruckLoader Unit for
Transportation
1. Make sure the engine is off.
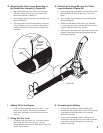
2. Disconnect the Carabiner (720487) from the hose band.
3. Attach the Carabiner to the chain link closest to the
Boom Arm Assembly.
4. Rotate the Boom Arm Assembly toward the vehicle to
allow the locking bosses on the Arm and Column to
line up. Once the bosses are aligned, insert the Linch
Pin (720437) through the hole and snap the ring over
the boss to secure.
5. Make sure the Chain Loop Assembly cannot make
contact with anything other than the Boom Arm
Assembly. If necessary, use a bungee cord to secure
it.
6. Remove the Hose Assembly from the Inlet Flange
Assembly.
7. Close the Inlet Flapper and rotate the Flapper Retainer
(720257) to allow the Flapper to be secured by
tightening the knob.
8. Remove the Discharge Nozzle from the
TruckLoader Housing.
9. Secure all the removed TruckLoader parts in the bed
of the vehicle with the proper rope or hardware.
10. Before moving a trailer containing the TruckLoader
unit, be sure that everything is properly secured for
road travel and that safety towing chains are properly
attached to the vehicle.
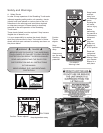
Engine Oil and Fuel:
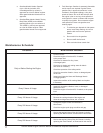
A. Oil Recommendations: using the proper type and
weight of oil in the crankcase is extremely important.
It is also important to check oil daily and change oil
regularly. Failure to use the correct oil, or using dirty
oil, causes premature engine wear and failure.
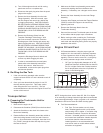
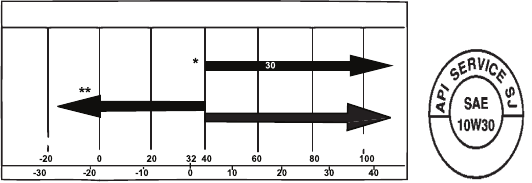
1. Oil Type: Use high quality detergent oil of API
(American Petroleum Institute) service class SC;
SH, SJ or higher. Select the viscosity based on
the air temperature at the time of operation as
shown in the following table.
NOTE: Using other than service class SG, SH, SJ or higher
oil or extending oil change intervals longer than recommended
can cause engine damage. A logo or symbol on oil containers
identifies the API service class and SAE viscosity grade.
B. Fuel Recommendations:
1. Fuel Type: For best results use only clean,
fresh, unleaded gasoline with a pump sticker
octane rating of 87 or higher. In countries using
the Research method, it should be 90-octane
minimum. Unleaded gasoline is recommended
as it leaves less combustion chamber deposits
and reduces harmful exhaust emissions.
Leaded gasoline is not recommended and
must not be used on models where exhaust
emissions are regulated.
10W-
5W-20, 5W-30
Kohler “Command”
RECOMMENDED SAE VISCOSITY GRADES
*Use of synthetic oil having 5W-20 or 5W-30 rating is acceptable, up to 40º.
**Synthetic oils will provide better starting in extreme cold (below -10ºF).