


12
Maintenance:
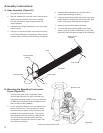
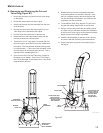
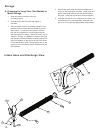
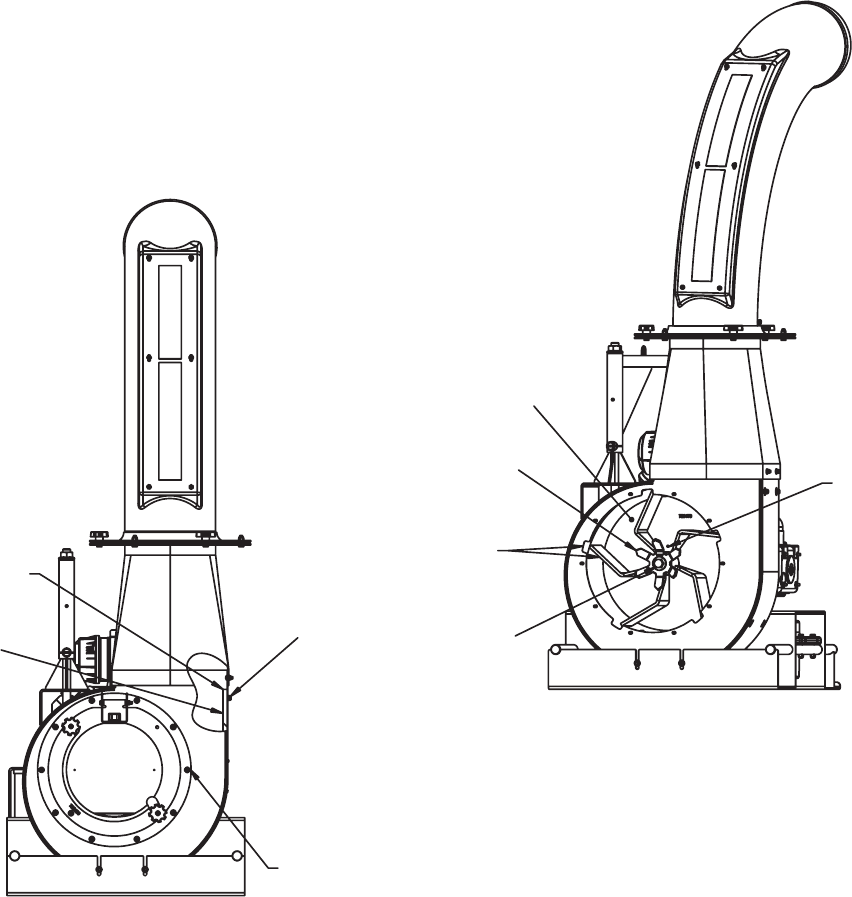
A. Removing and Replacing the Fan and
Talon Ring (Figure #7)
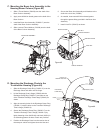
1. Disconnect the spark plug wires from the spark plugs
on the engine.
2. Disconnect safety switch wire from engine.
3. Unbolt and Remove the Inlet Assembly from the face
of the Housing.
4. Remove the bolt (64123-160) securing the Fan and
Talon Ring to the crankshaft of the engine.
5. Pull the Talon Ring off the face of the Fan hub.
6. Rotate the Fan to allow the blades to align with the
notches provided in the Housing face.
7. Thread a 3/4-16 x 5” long grade 5 (or better) bolt into
the hub to jack or push the Fan from the crankshaft of
the engine. (The Little Wonder #910505 jacking screw
is recommended.) **Take note of the orientation of the
fan with respect to the keyway upon removal. This is
important when reinstalling the Fan.**
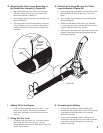
8. Upon removal of the Fan and Talon Ring, inspect for
damaged or worn blades. If the Fan or Talon Ring is
found to be damaged or excessively worn, it should be
replaced with a new part.
9. Reinstall the Fan onto the crankshaft and orient it
to the same position as removed in Step #6. Once
the Fan is aligned properly with the keyways of the
Fan hub and engine crankshaft in line, slide the Fan
completely onto the crankshaft.
10. To reinstall the Talon Ring, align the “D” hole in the
ring with the mating shape found on the Fan hub.
11. Using a new fan bolt (64123-160) and adding a dab
of Loctite 242 to it’s threads, complete the installation
of the Fan and Talon ring by securing the bolt with the
proper torque into the engine crankshaft.
12. Install the Inlet Assembly to the face of the Housing
and secure with the previously removed hardware.
13. Connect the spark plug wires to the spark plugs on
the engine.
Figure #7
RUBBER
LINER
REMOVE NUTS
TO DETACH
INLET ASSEMBLY
CHAMFERED
EDGE OF LINER
LINER
HARDWARE
TALON RING
USE HOLE IN FAN
BACK PLATE TO
ALIGN FAN HUB
KEYWAY WITH
KEY ON THE
CRANK SHAFT
ALIGN FAN BLADE
WITH HOUSING
NOTCH FOR FAN
INSTALLATION
AND REMOVAL
BOLT
(720572)
FAN ASSEMBLY
FIGURE #7
RUBBER
LINER
REMOVE NUTS
TO DETACH
INLET ASSEMBLY
CHAMFERED
EDGE OF LINER
LINER
HARDWARE
TALON RING
USE HOLE IN FAN
BACK PLATE TO
ALIGN FAN HUB
KEYWAY WITH
KEY ON THE
CRANK SHAFT
ALIGN FAN BLADE
WITH HOUSING
NOTCH FOR FAN
INSTALLATION
AND REMOVAL
BOLT
(720572)
FAN ASSEMBLY
FIGURE #7