


18
Section 4: Maintenance & Lubrication
PR1660, PR1672 & PR1690 Powered Rakes 314-216M
10/20/06
Land Pride
Table of Contents
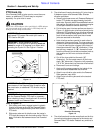
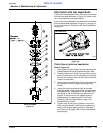
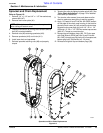
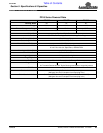
Clutch Assembly (with hex head bolts)
Refer to Figure 4-5
If clutch run-in indicated that one or more of the friction
disks did not slip, then the clutch must be disassembled to
separate parts.
1. Remove spring retainer nuts (#9a), springs (#2) and
bolts (#9b) from the assembly.
2. Each friction disk (#5) must then be separated from
the metal surface adjacent to it.
3. Inspect all parts for excessive wear and condition.
Clean all parts that do not require replacement.
• The original disk thickness is 1/8" and should be
replaced if thickness falls below 3/32".
• If the clutch has slipped to the point of “smoking”,
the friction disks may be damaged and should be
replaced. Heat build-up may also affect the yoke
joints.
Clutch Assembly
Figure 4-5
4. Reassemble each friction disk (#5) next to the metal
plate it was separated from.
5. Make certain bushing #4 is positioned as shown.
Install bolts (#9b) through the end plates and
intermediate plates as shown.
6. Place springs (#2) over the bolts and secure with
nuts (#9a).
23844
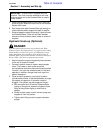
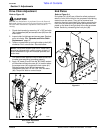
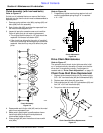
Refer to Figure 4-6
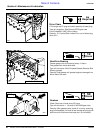
7. Progressively tighten each spring retainer bolt until
correct compressed spring length “A” is reached.
• A = 1.26”
Clutch Adjustment
Figure 4-6
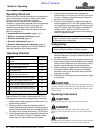
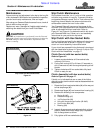
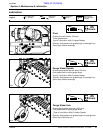
Drive Chain Maintenance
Refer to Figure 4-7
The operator should check chain tightness after initial
run in and periodically thereafter to make sure that the
drive chain is tensioned correctly. If adjustment is
needed refer to “Drive Chain Adjustment” on page 15.
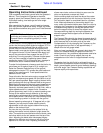
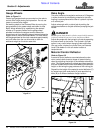
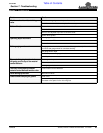
Chain Case Skid Shoe Replacement
1. Replace chain case skid shoe (#1) by removing four
3/8” x 3/4” hex head bolts (#2) and lockwashers (#3).
2. Replace worn skid shoe with new shoe.
3. Secure skid shoe (#1) with 3/8” lockwashers (#3) and
four 3/8” x 3/4” hex head bolts (#2).
4. Torque hex bolts to correct torque.
Chain Case Skid Shoe Replacement
Figure 4-7
23997
21096