


16
Section 4: Maintenance & Lubrication
PR1660, PR1672 & PR1690 Powered Rakes 314-216M
10/20/06
Land Pride
Table of Contents
Slip Clutch Maintenance
Slip clutches should be “run-in” prior to initial operation
and after long periods of inactivity. To prevent driveline
and gearbox damage, repeat “Run-In” instructions at the
beginning of each season and when moisture and/or
condensation seizes the inner friction disks.
Your Powered Rake will have one of two types of slip
clutches. One is adjustable with hex socket bolts and the
other is adjustable with hex head bolts. Refer to
Figure 4-1 and Figure 4-2 to determine which slip clutch
your Powered Rake has. Follow run-in and assembly
instructions for your particular slip below.
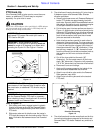
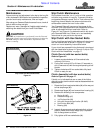
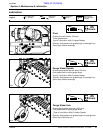
Slip Clutch with Hex Socket Bolts
If your clutch has enclosed friction disks and is tensioned
with hex socket bolts as shown in Figure 4-1, follow
clutch run-in and assembly instructions below.
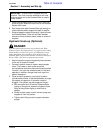
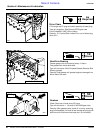
If your clutch has exposed friction disks and is tensioned
with hex head bolts as shown in Figure 4-2, skip to “Slip
Clutch with Hex Head Bolts” on page 17.
Clutch Run-in (with hex socket bolts)
Refer to Figure 4-1:
1. Loosen counterclockwise all 8 hex socket bolts
uniformly 6 full turns.
2. Cycle clutch on and off 5 or 6 times (15 seconds on
and 15 seconds off) with the engine operating at half
throttle.
3. Tighten clockwise all 8 hex socket bolts fully back.
Clutch is ready for use.
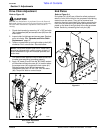
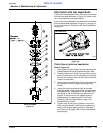
Clutch Assembly (with hex socket bolts)
Refer to Figure 4-3 on page 17:
If clutch run-in indicated that one or more of the friction
disks did notslip,then the clutch must be disassembled into
separate parts.
1. Rotate the 8 hex head socket bolts (#4) all the way out
to free stop flange (#5).
2. Rotate stop flange (#5) and remove from housing (#1)
3. Remove the following inner components:
a. Spring kit (#6)
b. Pressure flange (#7)
c. 1st Friction disk (#8)
d. Hub with flange and pull collar (#2 & #3)
e. 2nd Friction disk (#8)
f. Bearing (#9)
4. Inspect all components and replace to their original
position. Make certain stop flange (#5) is replaced
with its flange down as shown.
5. Fully tighten all 8 hex socket bolts (#4).
Maintenance
Proper servicing and adjustment is the key to the long life
of any implement. With careful and systematic inspection,
you can avoid costly maintenance, time and repair.
After using your Powered Rake forseveral hours, check all
bolts to be sure they are tight.
Replace any worn, damaged or illegible safety labels by
obtaining new labels from your Land Pride Dealer.
!
CAUTION
BEFORE any maintenance is performed, lower the Powered
Rake tothe ground, stoptractor engineand remove ignitionkey.
DO NOT attempt to make maintenance adjustments while
tractor is running.
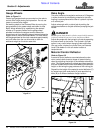
Slip Clutch with Hex Socket Bolts
Figure 4-1
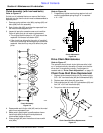
Slip Clutch with Hex Head Bolts
Figure 4-2
Hex Socket Bolts
21270
24501
Hex Head Bolts
Section 4: Maintenance & Lubrication