


17
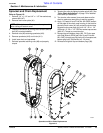
Section 4: Maintenance & Lubrication
10/20/06
PR1660, PR1672 & PR1690 Powered Rakes 314-216M
Land Pride
Table of Contents
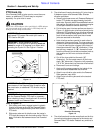
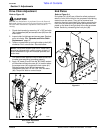
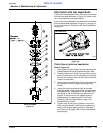
Clutch Assembly
Figure 4-3
21302
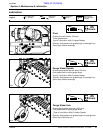
Slip Clutch with Hex Head Bolts
If your clutch has exposed friction disks and is tensioned
with hex head bolts as shown in Figure 4-4, follow clutch
run-in and assembly instructions below.
If your clutch has enclosed friction disks andis tensioned
with hex socket bolts as shown in Figure 4-1 on page 16,
follow instructions for “Slip Clutch with Hex Socket Bolts”
on page 16.
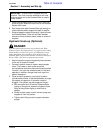
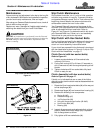
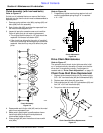
Slip Clutch with Hex Head Bolts
Figure 4-4
Clutch Run-In (with hex head bolts)
Refer to Figure 4-4:
1. Using a pencil or other marker, scribe a line across the
exposed edges of the clutch plates and friction disks.
2. Carefully loosen each of the 8 spring retainer nuts by
exactly 2 revolutions. It will be necessary to hold the
hex end of the retainer bolt in orderto count the exact
number of revolutions.
3. Cycle clutch on and off 2 times (2 to 3 seconds on and
15 seconds off) with the engine operating at half
throttle.
4. Inspect the clutch and ensure that the scribed
markings made on the friction disks and plate have
changed position. Slippage has not occurred if any
two marks on the friction disks and plate are still
aligned. A clutch that has not slipped must be
disassembled into separate parts. See Clutch
Assembly (with hex head bolts) on page 18 to
disassemble this clutch.
5. Tighten each of the 8 spring retainer nuts on the
clutch housing exactly 2 revolutions to restore the
clutch to the original setting pressure. See Step 7
and Figure 4-6 on page 18 for correct compressed
spring length.
24501
Hex Head Bolts