


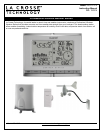
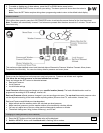

Model: WS-1517 www.lacrossetechnology.com/support 4
Note: Setup all three remote sensors and allow them to run for at least two minutes before powering the weather
station. Ensure all sensor readings are received on the weather station before mounting sensors outside.
STEP 1: Complete the initial setup on a table with all components within 10 feet of each other. This allows all the sensors
to connect repeatedly with the weather station during setup to lock the signal.
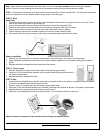
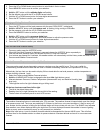
STEP 2: Wind
Wind Cups
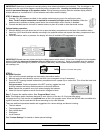
1. The wind cups are held on with a set screw. Use a flashlight to look into the mounting hole of the wind cups. Check
that the set screw is not obstructing the opening.
2. Look at the axle shaft of the wind sensor. Notice that one side of the axle shaft is flat.
3. Place the wind cups over the axle shaft of the wind sensor and gently slide them into place.
4. The set screw should connect with the flat side of the axle shaft to prevent slipping.
5. Use the hex key wrench tool provided to tighten the small set screw inside the cups.
6. Test to assure the wind cups are securely mounted on the anemometer shaft and spin freely
Battery installation
1. Remove four (4) screws from the battery compartment of the wind sensor. Be careful not to drop them.
2. Open the battery compartment and install two (2) AA size Alkaline batteries (not included) matching the polarities
shown.
3. Replace the battery compartment door and secure the screws.
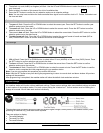
STEP 3: Thermo-hygro
1. Slide the battery cover down and lift off the back of the thermo-hygro sensor.
2. Install two (2) AAA size Alkaline batteries (not included) matching the polarities shown in
the battery compartment.
3. Replace the battery compartment door.
STEP 4: Rain
1. Unlock the funnel-shaped top on the rain sensor by turning both knobs on the sides in a counter-clockwise direction.
2. Lift the funnel-shaped top off the rain sensor bucket.
3. Remove seven (7) small screws from the battery compartment cover.
4. Insert two (2) AA size Alkaline batteries (not included), matching the polarities as shown in the battery compartment.
5. Replace the battery compartment door and secure the screws.
6. Insert the funnel-shaped top into the rain sensor bucket. Turn the knobs clockwise to secure it.
Allow all sensors to operate for two minutes before starting the weather station.