


14
4.1 START-UP PROCEDURE
1. Connect the high pressure hose to the machine outlet.
Ensure that the threads are aligned properly and that
the connection is secure.
2. Connect the garden hose to the machine inlet using
the quick connect. Make sure that the garden hose
is connected to a water supply that is turned on.
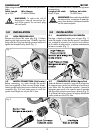
3. Insert the Click-N-Clean
TM
or Turbo lance into the
gun by pushing firmly and simultaneously twisting
a ¼ of a turn until locked into place (Fig.5).
4. Plug the GFCI into the power receptacle.
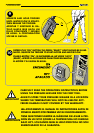
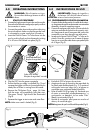
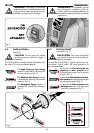
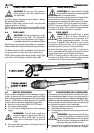
5. Ensure that the gun safety is unlocked (Fig. 3) and
squeeze the trigger until the air has escaped and a
steady flow of water is coming from the nozzle.
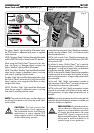
6. Depress the ON button
(Fig.6 - page 16). Note
that the motor will momentarily start then stop.
The green “Ready” light should be illuminated
(Fig.4).
7. Squ
eeze the trigger to start motor and water flow.
NOTE: Make sure wand is locked (Fig.5).
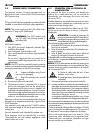
4.0 OPERATING INSTRUCTIONS
WARNING: Risk of injection or injury.
Do not direct discharge stream at self or
others.
4.0 INSTRUCCIONES DE USO
IMPORTANTE: Riesgo de ingerirlo o
de lesiones. NO dirija el chorro hacia sí
mismo o hacia otras personas.
Safety lock “locked”
Bloqueo de seguridad “cerrado”
Safety lock “unlocked”
Bloqueo
de seguridad “abierto”
ATENCIÓNWARNING
Fig. 3
Fig. 5
Fig. 4
4.1 PROCEDIMIENTO DE PUESTA EN MARCHA
1. Conec
te el tubo de alta presión a la salida de la máqui-
na. Asegúrese de que los conductos están correctamente
alineados y de que la conexión es segura.
2. Conecte la manguera del jardín a la entrada de la
máquina mediante el dispositivo de conexión rápi-
da. Asegúrese de que la manguera del jardín está
conectada a una toma de agua que esté activa.
3. Introduzca la lanza Click-N-Clean
TM
o Turbo en la
pistola. Para ello, presione con firmeza al tiempo
que gira un cuarto de vuelta hasta que queda fijada
en su lugar (Fig.5).
4. Enchufe el GFCI a la toma de corriente.
5. Asegúrese de que el dispositivo de seguridad de
la pistola está desbloqueado (Fig. 3) y apriete el
accionador hasta que salga aire y se genere un
caudal de agua constante desde la boquilla.
6. Pulse el botón ON
(Fig.6-pág.16). Recuerde que
el motor se encenderá momentáneamente y, a
continuación, se detendrá. La luz verde “Listo”
(Ready) se encenderá (Fig.4).
7. Apriete el accionador
para poner en marcha el
motor y el caudal de agua.
NOTA:A
segúrese de que la varilla está bloqueada (Fig.5).
Listo