


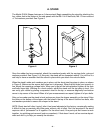
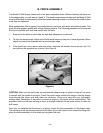
A. STAND
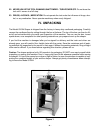
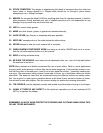
The Model G1024 Shaper features an A-frame stand. Begin assembling the stand by attaching the
four rubber feet to the bottom of the side panels with the M6-1.0x12 hex bolts, M6-1.0 hex nuts and
3
/8" flat washers provided. See Figure 4.
Figure 4
- 9 -
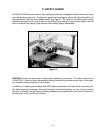
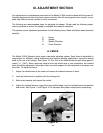
Figure 5
Once the rubber feet are connected, attach the crossbars loosely with the carriage bolts, nuts and
washers provided. See Figure 5. At this point, the stand will be somewhat wobbly. You will find it a
real help to have an assistant hold the stand in place while you attach the nuts and bolts.
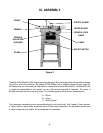
When the stand’s sides and crossbars are in place, set the sheet steel top piece in place, as shown
in Figure 5. Make sure the square bolt holes are in alignment. When the bolt holes are correctly in
line, attach the remaining carriage bolts. When you’ve got all the bolts attached, tighten all the nuts
and bolts finger-tight. Working on a level surface, adjust the stand until the top piece is level. You
can verify your results by placing a carpenter’s level on the top, or measure diagonally from bottom
corner to top corner of the stand. When all of your measurements are equal, tighten all of your bolts.
After you’ve made sure the stand is level and secure, place the shaper assembly on the stand. Align
the holes on the bottom of the shaper with the holes in the top of the stand. Use the hex bolts, nuts
and washers provided to secure the shaper to the stand.
NOTE: Sheet steel will often “spring” after it has been fabricated at the factory, occasionally making
it difficult to line up precisely with other parts without a bit of effort. Don’t be surprised if the stand
requires a bit of “persuasion” to fit together. On the other hand, if the parts just don’t seem to work
together, try switching parts around (such as crossbars). If that doesn’t work, call our service depart-
ment and we’ll try to help you remedy the situation.