


8
Vektor-CD Centrifugal Laboratory Exhaust
®
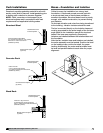
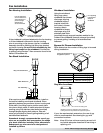
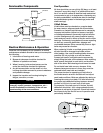
Plenum and Fan Drainage Piping and
Trap Detail (by others)
There are multiple locations for pipe connections, one
on each plenum section, and another on each tubular
fan housing located at the bottom of the scroll. Each
drain should be properly connected to a drainage
system to ensure proper disposal of any water or
condensate that may occur.
• Installed piping to have a downward angle to
allow for drainage
• Fill trap to recommended level before start-up
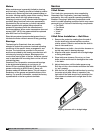
Y Dim ≥ System Pressure
X Dim ≥ 1/2 System Pressure
Dimension of X and Y are inches.
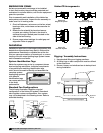
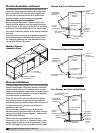
Bypass Air Plenum (BAP), Isolation
Damper Access & Actuator Mounting
Depending on the configuration and intended
operation of the system supplied, every Vektor plenum
section may not have a weatherhood and bypass air
damper. Typically systems that include a fan which
is on standby will have one less weatherhood and
BAP damper assembly than plenum sections. Refer
to submittal drawings for additional information. The
appropriate guard / cover needs to be removed for
installation, inspection and maintenance.
For Vektor Fans with a Weatherhood
Access to the bypass air plenum damper and the
isolation damper, actuator(s) (optional from factory),
and voltage transformer (optional from factory) is
gained through the removal of the weatherhood
guard / cover. The isolation damper assembly can be
removed from its location by unbolting the frame from
the plenum and removing the flex connector.
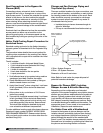
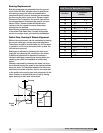
Duct Connections to the Bypass Air
Plenum (BAP)
Connecting primary exhaust air ducts is allowed
through the roof curb or through one or more of the
side access panels. To reduce the potential for system
effects in the plenum, the duct connection should
be sized to have a maximum air velocity of 1500 fpm
when entering. When attaching ductwork to the
plenum, care should be taken to ensure a tight fit and
proper seal to prevent leakage of the contaminated
airstream.
Ductwork that is a different size than the removable
access panel can either use a transition to the
plenum’s opening size, or the access panel can be
field modified by cutting an opening to the size of the
ductwork.
Vektor Field Coating Repair Procedure for
Scratched Areas
Standard coating and color for the Vektor laboratory
exhaust system is Greenheck’s Hi-Pro Polyester Gray
(041).
The procedure below details the correct method for
repairing minor scratches in the coating. Each Vektor
unit is supplied with a repair kit for use after the initial
installation.
The kit includes:
• 1 pint Kem Kromik
®
Universal Metal Primer
• 1 pint industrial enamel (Industrial 041 Gray)
• 4 disposable foam brushes
• 1 sheet of sandpaper
• 2 tech data sheets for the two paints
• 1 repair procedure.
1. Scuff affected area to be repaired using medium
sandpaper (provided). Feather the edges.
2. Clean affected area to be touched up using an
alkaline based cleaner and rinse.
3. Apply Kem Kromik
®
primer using the 1 inch foam
brush (provided). Follow technical data sheet
instructions.
4. Allow primer to dry a minimum of 2-1/2 hours
before top coating.
5. Topcoat with Industrial enamel using 1 inch foam
brush (provided). Follow technical data sheets
instructions. Allow painted units to air-dry and
cure before putting into service. See enclosed
Technical Data sheets for detailed drying and
cure schedules at different temperatures.
To order additional coating repair kits please reference
Greenheck’s part number, HAZ2037 HI-PRO GRAY
FIELD DAMAGE REPAIR KIT. Please contact factory
with your fan’s serial number for colors other than our
standard Gray (041).
Y
X
1 inch of water
A
B
C
Detail of bypass air
plenum and blower
housing
Clean out location
1 in. drain coupling in blower
housing and bypass air plenum
Note: Refer to local codes for proper disposal of
potential hazardous drainage.