


10
Vektor-CD Centrifugal Laboratory Exhaust
®
Unit Start-Up
1. Disconnect and lock-out all power switches to
fan.
2. Check for bearing alignment and lubrication.
3. Check the V-belt drive for proper alignment and
tension (belt drive).
4. Check rigid coupling for proper alignment and
connect between motor shaft and fan shaft
(direct drive).
5. Check all guarding to ensure that it is securely
attached and not interfering with rotating parts.
6. Check operation of isolation and bypass dampers
(if supplied) for freedom of movement.
7. Check all electrical connections for proper
attachment.
8. Check housing and ductwork, if accessible,
for obstructions and foreign material that may
damage the fan wheel.
9. Fill drainage piping trap.
10. Check all fasteners, set screws and locking
collars on the fan, bearings, drive, motor base
and accessories for tightness.
11. Rotate the fan wheel by hand and assure no parts
are rubbing.
Additional steps for initial start-up
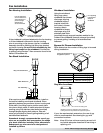
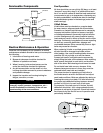
1. Check for proper wheel rotation by momentarily
energizing the fan. Rotation is always determined
by viewing the wheel from the drive side and
should correspond to the rotation decal affixed to
the unit.
One of the most frequently encountered problems
with Centrifugal Fans are motors which are wired
to run in the wrong direction. This is especially
true with 3-phase installations where the motor
will run in either direction, depending on how it
has been wired. To reverse rotation of a 3-phase
motor, interchange any two of the three electrical
leads. Single phase motors can be reversed by
changing internal connections as described on
the motor label or wiring diagram.
2. If the fan has inlet vanes, they should be partially
closed to reduce power requirements. This is
especially important if the fan is designed for a
high temperature application and is being started
at room temperature.
3. Fans with multi-speed motors should be checked
on low speed during initial start-up.
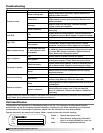
4. Check for unusual noise, vibration or overheating
of bearings. Refer to the “Troubleshooting”
section of this manual if a problem develops.
5. Grease may be forced out of the bearing seals
during initial start-up. This is a normal self-
purging feature of this type of bearing.
Vibration
Excessive vibration is the most frequent problem
experienced during initial start-up. Left unchecked,
excessive vibration can cause a multitude of
problems, including structural and/or component
failure. The most common sources of vibration are
listed below.
• Wheel Unbalance
• Drive Pulley Misalignment
• Incorrect Belt Tension
• Bearing Misalignment
• Mechanical Looseness
• Faulty Belts
Many of these conditions can be discovered by
careful observation. Refer to the troubleshooting
section of this manual for corrective actions. If
observation cannot locate the source of vibration,
a qualified technician using vibration analysis
equipment should be consulted. If the problem is
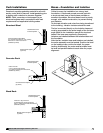
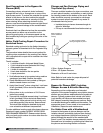
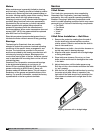
wheel unbalance, in-place balancing can be done
through the access panel located on the side of each
fan’s tubular housing. Any correction weights added
to the wheel should be welded to either the wheel
back (single-plane balance) or to the wheel back and
wheel cone (two-plane balance).
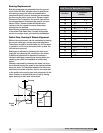
Greenheck performs a vibration test on all centrifugal
fans before shipping. Three vibration readings are
taken on each bearing in the horizontal, vertical, and
axial directions. The allowable maximum vibration
for belt drive units is 0.10 in./sec. peak (0.08 in./sec.
direct drive) velocity filter-in at the fan rpm per AMCA
Standard 204. These vibration signatures are a
permanent record of how the fan left the factory and
are available upon request.
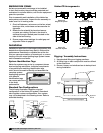
CW Rotation - always viewed from the drive side.
Centrifugal
Backward Inclined
Centrifugal
Airfoil
WARNING
Disconnect and secure to the “Off” position all
electrical power to the fan prior to inspection
or servicing. Failure to comply with this safety
precaution could result in serious injury or death.