


6
Vektor-CD Centrifugal Laboratory Exhaust
®
Plenum Installation
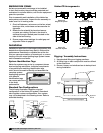
The figures depicted illustrate three common methods
used to install Vektor-CD bypass plenums. Methods
used to attach a Vektor unit are dependent on local
codes, roof construction design and roof construction
materials. Consult an architect or structural engineer
for proper means of attachment.
Place 1/2 inch thick x 1/2 inch wide silicone gasket
around the perimeter of top edge of curb, adhesive
side down (gasket provided in Vektor-CD hardware kit).
To align holes properly, the plenum needs to be
centered on the curb.
When holes are provided in the curb, install 316
stainless steel screws (provided) in all holes. Use anti-
seize gel (provided) to prevent galling / welding of all
stainless steel fasteners.
When holes are not provided in the curb (non
Greenheck curb): Drill 0.28 in. diameter holes in curb
using bypass air plenum holes as a template. Install
5/16 in. self-tapping screws (provided) in all the holes.
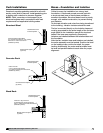
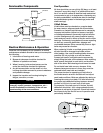
TO CHANNEL BASE
TO STRUCTURAL STEEL
TO ROOF DECK
TO ROOF DECK
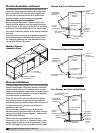
FAN, PLENUM AND CURB -
FAN, PLENUM, AND CURB -
FAN AND PLENUM (NO CURB) -
FAN AND CURB (NO PLENUM) -
Bypass Air
Plenum
Weatherhood
with birdscreen
(optional)
Roof Curb
Bolt or weld in field
(by others)
Structural Support
(by others)
Fiberglass
Insulation
5
⁄16 in. bolt
(typical)
(by Greenheck)
3
⁄16 in. silicone gasket
(by Greenheck)
3
⁄8 in. bolt
(typical)
(by Greenheck)
Plenum and Curb to Structural Steel
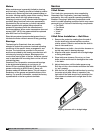
TO CHANNEL BASE
TO STRUCTURAL STEEL
TO ROOF DECK
TO ROOF DECK
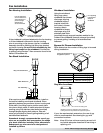
FAN, PLENUM AND CURB -
FAN, PLENUM, AND CURB -
FAN AND PLENUM (NO CURB) -
FAN AND CURB (NO PLENUM) -
Field drilled & bolted
(by others)
Bypass Air
Plenum
Structural Support
(by others)
3
⁄16 in. silicone gasket
(by Greenheck)
Weatherhood
with birdscreen
(optional)
5
⁄16 in. bolt
(typical)
(by Greenheck)
Plenum (no Curb) to Channel Base
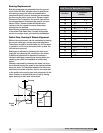
Fan, Plenum, and Curb to Roof Deck
Plenum Assembly continued
An additional side (or access) panel may need to be
removed in order to gain access to the inside of the
plenum assembly. The bolts should be tightened in
an even and consistent manner as to pull the two
sections together and compress the gasketing.
After the plenum is assembled
Use all provided hardware to tighten and join the
mating sections together. Any side panels removed
to gain access to the interior of the plenum should be
reattached. The assembled plenum has holes in the
curb cap to fasten the plenum to the already installed
roof curb.
The plenum is now ready to have gasketing placed in
the mounting location between the plenum and the
fan. After the gasketing has been attached the fans
can be lifted and set into place.
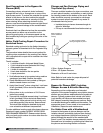
Modular Plenum
Isometric View
5
⁄16 in. self-tapping screws
(by Greenheck)
TO CHANNEL BASE
TO STRUCTURAL STEEL
TO ROOF DECK
TO ROOF DECK
FAN, PLENUM AND CURB -
FAN, PLENUM, AND CURB -
FAN AND PLENUM (NO CURB) -
FAN AND CURB (NO PLENUM) -
Exhaust Duct
(by others)
Weatherhood
with birdscreen
(optional)
Bypass Air
Plenum
3
⁄16 in. silicone gasket
(by Greenheck)
Bolt or weld in field
(by others)
3
⁄8 in. bolt
(typical)
(by Greenheck)
Roof Curb
Fiberglass
Insulation
Roof Line
(Roofing felt
& material
by others)
Lifting Lugs
Drain hole
1 in. coupling
Bolted and gasketed
access panels