


24
4.2 ADJUSTMENTS
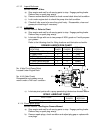
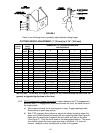
4.2.1 Adjusting cutting height with blade spacers:
Blades may be adjusted for cutting height by using the four 1/4" (.64 cm) spacers
found on the blade spindle bolts (factory setting is two above and two below). This
allows a 1" (2.5 cm) range in 1/4" (.64 cm) increments of cutting height in any axle
position. The same number of blade spacers must be used on all blades to
achieve a level cut (two above and two below, one above and three below, etc.).
For the best cut and discharge a minimum of two spacers should be placed
between the blade and spindle shaft. The highest quality cut can be achieved
with all four spacers between the blade and the spindle shaft.
If the mulching kit is installed, the highest quality cut can be obtained with 3
spacers between the blade and spindle (minimum is 1 for a good cut).
If you need to cut higher or lower than what the spacers will allow, it will be necessary
to adjust the rear axle height and caster position. See Section 4.2.2 below.
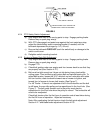
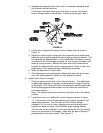
4.2.2 Axle height and caster spacer position
:
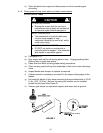
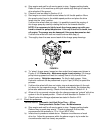
Desired cutting height range can be obtained by adjusting the rear axle and
placing caster spacers above or below the caster arm (See Figure 5).
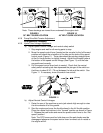
To adjust rear axle:
a) Stop engine and wait for all moving parts to stop. Engage parking brake.
Remove key or spark plug wire(s).
b) Raise the rear of the machine up onto jack stands and remove the drive
wheels.
CAUTION
POTENTIAL HAZARD
♦ Raising the mower deck for service or
maintenance relying solely on mechanical
or hydraulic jacks could be dangerous.
WHAT CAN HAPPEN
♦ The mechanical or hydraulic jacks may
not be enough support or may
malfunction allowing the unit to fall, which
could cause injury.
HOW TO AVOID THE HAZARD
♦ DO NOT rely solely on mechanical or
hydraulic jacks for support. Use adequate
jack stands or equivalent support.
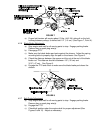
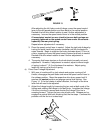
c) Loosen but do not remove the top two bolts on each hydraulic motor
mounting bracket, (See Figure 5).
d) Remove the bottom sets of hardware for each bracket.
e) Reposition the mounting bracket to the desired height and reinstall the
bottom hardware.
f) Tighten all hardware and remount drive wheels.