


16
Release both lap bars and the machine
should stop turning.
3. To turn counter-clockwise, slowly move
the RIGHT lap bar forward while simulta
-
neously moving the LEFT lap bar rear-
ward. Release both lap bars and the
machine should stop turning (this is a
safety check, the normal procedure is for
the operator to slowly bring the lap bars
to the neutral position).
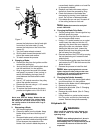
3. Start the Engine:
a. Open the fuel shutoff valve.
b. Sit on the Seat. Set the parking brake
“On”.
c. Make sure that the left and right steering
levers are in their neutral position.
d. Turn the electric blade clutch switch “Off”.
e. Push the throttle control to a position a
third of the way between slow and fast.
f. Insert the key in the ignition and start
switch and turn the switch to “On”.
g. Gasoline Engine: If the engine is cold,
push the choke to the on position.
Note: E.F.I. Tanks do not have a choke control.
h. Turn the ignition key in a clockwise direc-
tion to the “Start” position until the engine
starts.
Note: Do not hold the key in the “Start”
position for more than 10 seconds or you may
damage the starter. If the engine does not start
in this time, wait about 30 seconds and try
again.
i. Gasoline Engine: Once the engine starts,
push the choke on halfway and as the
engine warms, push the choke off all the
way.
4.
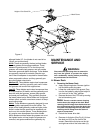
Operating the Mower:
Operating a zero-turn-
ing-radius mower is not like operating a trac-
tor-type riding mower. The zero-turning-radius
mower is much more maneuverable and
much less fatiguing to operate. However, get
-
ting used to the fingertip control of the zero-
turning-radius mower takes some practice.
We strongly recommend that you locate a
“test area” where you can operate the mower
for about 30 minutes without being disturbed.
a. Get into the operator’s seat.
b. Start the engine.
c. Use the upper foot pedal to raise the mow-
ing deck to the transport position. Make
sure the blade clutch switch is off.
d. After the engine has warmed, adjust the
throttle to the fast position.
e. Release the parking brake.
f. Fold in the steering levers to the operating
position.
WARNING:
When operating this mower forward, do not
allow the steering levers to return to the neu-
tral position on their own. Always maintain a
firm grip on the steering levers, operate them
smoothly and avoid any sudden movements of
the levers when starting or stopping.
g. To go forward, move both steering levers
slightly forward and the mower will slowly
move forward. The farther you move the
levers forward the faster the mower will go
forward.
h. To back up, move both steering levers
slightly backward and the mower will
slowly move backward. The farther you
move the levers backward the faster the
mower will go backward.
i. To turn, pull the lever back on the side to
which you want to turn. The farther back
you pull the lever, the faster and more
sharply you will turn. Initially, you will have
to be careful to avoid turning to fast and
too far.
j. After you have mastered operating the
mower, use the second foot pedal to lower
the mowing deck to the cutting position
and pull on the electric blade clutch switch
to start the blades rotating.
k. Practice mowing in straight passes. When
you feel confident, slowly practice mowing
around obstacles such as trees.
5. Parking the Mower:
a. Push off the electric blade clutch switch.
b. Use the upper foot pedal to raise the mow-
ing deck to the transport position.
c. Drive the mower to the cleanup or storage
area.
d. Move the throttle to slow.
e. Place the steering levers in the neutral
position.
f. Set the parking brake.
g. Turn off the ignition switch and take the key
from the switch.
h. Close the fuel shutoff valves.
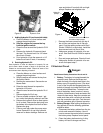
E.Mower Cutting Blades
The blades normally “factory installed” on a mower
afford the best grass cutting performance on the
majority of grasses and mowing conditions; however,
there will be occasions whereby the grass type,
stage of grass growth, soil conditions, and weather
conditions will require different cutting blade types.
Since the mower decks are designed so that over-lap
of the cutting blades generally exceed 1.5”, there is
no need for orientation of one cutting blade to an