


20
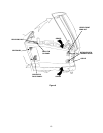
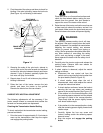
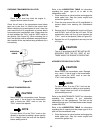
2. Pivot the ends of the axle up and down to check for
binding. If the axle is binding, loosen the lock nuts
(See Figure 14) until binding is eliminated.
Figure 14
3. Grasping the ends of the pivot axle, attempt to
move each end of the axle forward and rearward
to check for side play between the axle and frame
channel. If play is present, gradually tighten the
lock nuts until play is minimized.
4. Repeat steps 2 and 3 until minimum play without
binding is achieved.
5. Raise the front of the tractor, remove the jack
stands, and lower the tractor to the ground.
Remove the blocks from the rear wheels.
HYDROSTATIC NEUTRAL ADJUSTMENT
The following adjustments will be necessary if the
tractor creeps forward or rearward when neither the
forward nor reverse pedals are depressed.
Checking the Transmission Neutral Setting
To check and adjust the transmission neutral setting,
proceed as follows:
1. Drive the tractor for approximately 5-10 minutes to
warm up the transmission, then stop the engine
and engage the parking brake.
WARNING
Place the tractor on a firm and level surface and
chock the front wheels before raising the rear
wheels from the ground. Use jack stands to
support the rear of the tractor when raised.
2. Raise the rear of the tractor, so that the rear tires are
at least one inch above the surface, and set it on
jack stands. Make certain the jack stands are posi-
tioned to balance the tractor and prevent tipping.
WARNING
The operator presence safety circuit will stop
the engine if the seat is empty when the brake
pedal is released. If an assistant is seated when
adjusting the neutral setting, use extreme
caution to prevent the tractor from tipping or
rolling. Similar precautions should be taken with
any other method of over-riding the safety
circuit, such as placing a weight in the seat.
Never operate the tractor with the safety circuit
disabled.
3. Carefully start the tractor engine and release the
parking brake. Observe both rear wheels for
rotation in either direction.
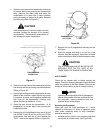
4. If wheel rotation is observed, adjust the neutral
setting as follows:
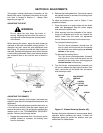
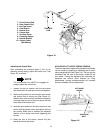
a. Disconnect the rear control rod from the
control arm by removing the hairpin cotter from
the pivot sleeve (Refer to Figure 15).
b. If wheel rotation stops when the rod is
disconnected, check and readjust the control
rod per the instructions below.
c. If wheel rotation continues, loosen the locknut
securing the hex cap screw and centering
spacer to the neutral bracket (See Figure 15).
d. If the rotation is in the forward direction, slide
the centering spacer rearward until the wheels
just begin to rotate in the reverse direction.
Then slowly slide the spacer slightly forward
until wheel rotation stops.
e. If the rotation is in the reverse direction, slowly
slide the centering spacer slightly forward until
rotation stops.
f. Carefully tighten the hex cap screw and
locknut, making certain the centering spacer
does not move.
g. Stop the engine and engage the parking
brake.
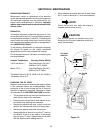
SECTION A-A
PIVOT
AXLE
LOCK
NUTS
A
A
FRAME AXLE
CHANNEL
PIVOT AXLE
ADJUSTMENT BOLTS
LOCK
NUT