


Ifthesnowthrowerwiltnotbeusedfor30daysor
longer,orattheendofthesnowseasonwhenthelast
possibilityofsnowisgone,theequipmentneedsto be
storedproperly.
_b WARNING: Never store snow thrower with
fuel in tank indoorsor in poorly ventilated
areas, where fuel fumes may reach an open
flame, spark or pilot light as on a furnace, water
heater, clothes dryer or gas appliance.
1. Remove all gasoline from the carburetor and the
fuel tank to prevent gum deposits from forming on
these parts and harming the engine.
IMPORTANT: Fuel left in engine during warm weather
deteriorates and will cause serious starting problems.
NOTE: Fuel stabilizer (such as STA-BIL) is an
acceptable alternative in minimizing the formation of
fuel gum deposits during storage. Add stabilizer to
gasoline in fuel tank or storage container. Always follow
mix ratio found on stabilizer container. Run engine at
least 10 minutes after adding stabilizer to allow it to
reach the carburetor. Do not drain carburetor if using
fuel stabilizer.
_ WARNING: Drain fuel into approved
container outdoors, away from any open flame.
Be certain engine is cool. Do not smoke.
2. Run the engine until the fuel tank is empty and it
stops due to lack of fuel
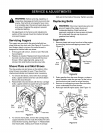
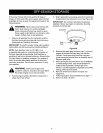
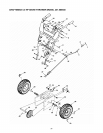
3. Drain carburetor by pressing upward on bowl drain,
located below the carburetor cover. See Figure 20.
IMPORTANT: Do not drain carburetor if using fuel
stabilizer. Never use engine or carburetor cleaning
products in the fuel tank.
Carburetor
Bowl
Drain
Figure 20
4. Remove the spark plug and pour one (1) ounce of
engine oil through the spark plug hole into the
cylinder. Cover spark plug hole with a rag and
crank the engine several times to distribute the oil.
Replace spark plug.
5. When storing the snow thrower in an unventilated
or metal storage shed, care should be taken to
rustproof the equipment. Using a light oil or
silicone, coat the equipment, especially any chains,
springs, bearings and cables.
6. Remove all dirt from exterior of engine and
equipment.
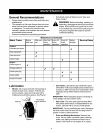
7. Follow lubrication recommendations on page 11.
8. Store in a clean, dry area.
17