


moisture which loads to separation and for-
mationof acids during storage. Acidic gas
can damage tho fuel system of an ongine
while in storage.
To avoid engino probloms, the fuol system
should be emptied before storage for 30
days or longer. Star the engino and let it run
until the fuel lines and carburetor are empty.
Use the carburetor bowl drain to empty re-
sidual gasoline from the float chamber. Use
fresh fuel next season (see
Storage instructions on page 23 for addi-
tional information).
Never use engine or carburetor cleaner
products in the fuel tank or permanent dam-
age may occur.
Fill the fuel tank with a fresh, clean, un-
leaded regular, unloaded premium, or
reformulated automotive gasoline only. DO
NOT use leaded gasoline. Be sure that the
container you pour the gasoline from is
clean and free from rust or other foreign par-
ticles. Never use gasoline that may be stale
from long periods of storage in the con-
tainer.
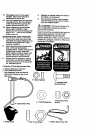
Z_ CAUTION: Gasoline is flammable and
caution must be used when handling or stor-
ing it.
Do not fill fuel tank while snow thrower is
running, when it is hot, or when snow
thrower is in an enclosed area.
Keep away from open flame or an electrical
spark and DO NOT SMOKE while filling the
fuel tank.
NEVER till the tank completely. FILL THE
TANK to within 1/4" - 1/2" from the top to
provide space for expansion of fuel.
Always fill fuel tank outdoors and use a fun-
nel or spout to prevent spilling.
Make sure to wipe up any spilled fuel before
starting the engine.
Store gasoline in a clean, approved con-
tainer and keep the cap in place on the con-
tainer.
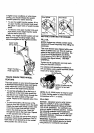
TO STOP ENGINE
• To stop engine, movethe throttlecontrol
lever to II (STOP) position and remove
key. Keep the key in a safe place. The
engine will not start without the key.
NOTE: DO NOT rum key.
TO START ENGINE (Electric Starter)
Be sure that the engine has sufficient oil.
The snow thrower engine is equipped with a
_2
120 volt A.C. electric starter and recoil
starter. Before starting the engine, be cer-
tain that you have read the following infor-
mation:
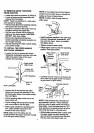
COLD START
• Be sure the auger drive and traction drive
levers are in the disengaged (released)
position.
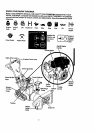
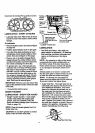
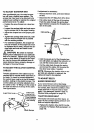
• Move the throttle controRo _ (FAST)
position. See figure on page 9.
• Remove the keys from the plastic bag.
Insert one key into the ignition slot. Be
sure it snaps into place. DO NOT TURN
KEY. Keep the Second key in a safe
place.
• Rotate the choke knob to H choke On
position. See figure on page 9.
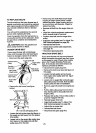
• Connect the power cord to the switch box
on the engine.
/_ CAUTION: This starter is equipped
with a three-wire power cord and plug and is
designed to operate on 120vott AC house-
hold current. It must be properly grounded
at all times to avoid the possibility of electri-
cal shock, which may be injurious to opera-
tor. Follow all instructions carefully as set
forth in the "To Start Engine" section. Deter-
mine that your house wiring is a three-wire
grounded system. Ask a licensed electri-
cian if you are not sure. If your house wire
system is not a three-wire system, do not
use this electric starer under any condi-
tions. If your system is grounded and a
three-hole receptacle is not available at the
point your starter will normally I_e used, one
should be installed by a licensed electrician.
When connecting 120 volt AC power cord,
always connect the cord to the switch box
on the engine first, then plug the other end
into the three-hole grounded receptacle.
When disconnecting power cord, always un-
plug the end in the three-hole grounded re-
ceptacle first.
• Plug the other end of the power cord into
a three-hole, grounded 120 volt A.C.
receptacle.
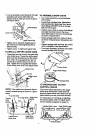
• Push the primer button while covering the
vent hole as follows: (Remove finger
from primer button between primes).
See figure on page 9 for location.
Do not prime if temperature is above
50°F.
Two times iftempersture is 50°F to 15°F.
Four times iftemperatlJre is below 15°F.