


TOOLSREQUIREDFORASSEMBLY
(1) 7/16"Wrench
(1) 1/2"Wrench
(1) 9/16"Wrench
(1) 3/4"Wrench
(1) AdjustableWrench
(1) PhillipsScrewdriver
(1) Hammer
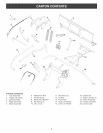
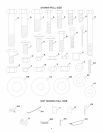
, Removea!lpartsandhardwarepackagesfromthe
carton.Layoutpartsandhardwareandidentifyusing
theillustrationsonpages3and4.
NOTE: Notallofthesuppliedpartsandhardwarewillbe
neededforoneparticulartractor.Unneededitemsmaybe
discardedafterassemblyhasbeencompleted.
NOTE: Righthand(RH)andlefthand(LH)are
determinedfromtheoperator'spositionwhileseatedon
thetractor.
CAUTION: Donotbeginassembling
untilthetractorengine,mufflerandexhaust
deflectorhavebeenallowedtocooloff.
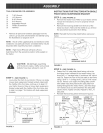
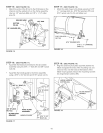
STEP 1: (SEE FIGURE 1)
, Look under the front of your tractor. If there is a single
mower deck suspension bracket located underneath
the middle of the front axle, continue on to step 2. If
your tractor does not have a mower deck suspension
bracket underneath the middle of the front axle, skip
to step 5 on page 7 for tractors with dua! suspension
brackets.
"_---_ BRACKET "--_--J"
FIGURE 1
iNSTRUCTiONS FORTRACTORS WITH SINGLE
FRONT DECK SUSPENSION BRACKET
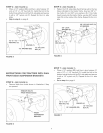
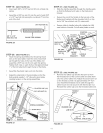
STEP 2: (SEE FIGURE 2)
Remove the tractor hood. Refer to your tractor owners
manual for instructions on how to properly remove
the hood.
, Remove the browning shield from the front of the
tractor as shown. Hold onto the shield as you remove
the second bolt to prevent it from falling.
NOTE: Reinstall the browning shield before using your
tractor.
\
\
REMOVE
BROWNUNG SHUELD
FIGURE 2
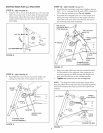
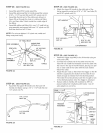
STEP 3: (SEE FIGURE 3)
, Fasten the R.H. side plate (bend facing out) to the
front three holes indicated in the tractor frame. Use
three 3/8" x 1" carriage bolts (J) and three 3/8" nylock
nuts (Q). Fasten the rear of the side plate to the frame
using a 5/16" x 1" carriage bolt (L) and a 5/16" ny!ock
nut (V). If there is an engine mounting plate (shown
with dotted lines) that prevents the side plate from
resting flat against the tractor frame, use three large
1/2" washers (CC) as shims between the side plate
and the frame. Tighten all bolts. Repeat for the LH.
side plate.
, Reinstai! the browning shield removed in figure 2.
5/16" x t" ENGmNE LARGE 1/2"
CARRmAGE MOUNTmNG WASHER (CO)
BOLT (L) PLATE (IF
5/16" NYLOCK --_
NUT (V)
J
/
3/8" NYLOCK
NUT (Q)
318" x 1" CARRIAGE
BOLT (J)
FIGURE 3
6